Categories
Apple Editorial Photographic Pictorial

the new apple store, covent garden

I had a bit of an accident with my iPhone – sort of shattered the back glass panel. I booked a Genius Bar appointment and the soonest was at the new Covent Garden store. I’d heard it was beautiful inside, so took my camera along and got some nice shots as well as having the iPhone completely replaced for free! I think I was rather lucky there.

I decided to stick with JPG when shooting and found that perhaps this might have been one time shooting RAW would have been worth it. Getting the white balance right in there was a case of checking in each different room as there’s just about every light source imaginable going on – fluorescent-style panels and tungsten is everywhere, and daylight pours through the glass ceiling in the courtyard and stairwells. Getting them home, I wanted to change the white balance on a bunch of them so some these have had some Levels and Curves tweaks just to get them looking sort of okay. I think a few of them would take really well to further processing but here’s my ‘raw-ish’ favourites.

Categories
iOS & Mac reviews Reviews

pictureshow – stealing hipstamatic’s crown

The iPhone photo app market is saturated with apps to replicate the retro look. It’s probably a fad that should be on it’s last legs, but the apps keep coming and truth be told I do still like the look when it suits the image so purists be damned!

For the last few months I’ve almost exclusively been turning to the fantastic Hipstamatic to tart up my iPhone photos and wrote a wee appraisal of it a few months ago. Since then the creators have released a second photo app called Swankolab which I played with for a few days and was going to write about. I ended up not bothering in the end as I didn’t really enjoy using it.

Briefly, Swankolab has a very attractive interface designed around a darkroom, with you combining squirts of developing fluid into a tray that your chosen photo is ‘dipped’ in to create unique effects, and the whole process unfolds with amusing animation of the chemicals pouring into the tray and the print sloshing around as it develops.

For me, immediacy is key with iPhone photo tweaking. Where Hipstamatic is pretty snappy, I found Swankolab fussy, and the processing itself very sluggish on my 3G (when I upgraded to the iPhone 4 the first app I tested was Swankolab and it was a little faster but not much). The animations and lengthy processing began to grate, I could never really remember what effect each ‘chemical’ had and the sheer depth of combinations ended up being daunting rather than inspirational.

It’s a beautiful app and potentially a lot of fun so long as you have a bit of patience. Sadly I didn’t – however, all of this sets up what I like about graf’s PictureShow (App Store link)

PictureShow has had a recent update to version 2. I never tried the original, but I found some references to it online and this update appears to have been quite the bumper pack of new features.

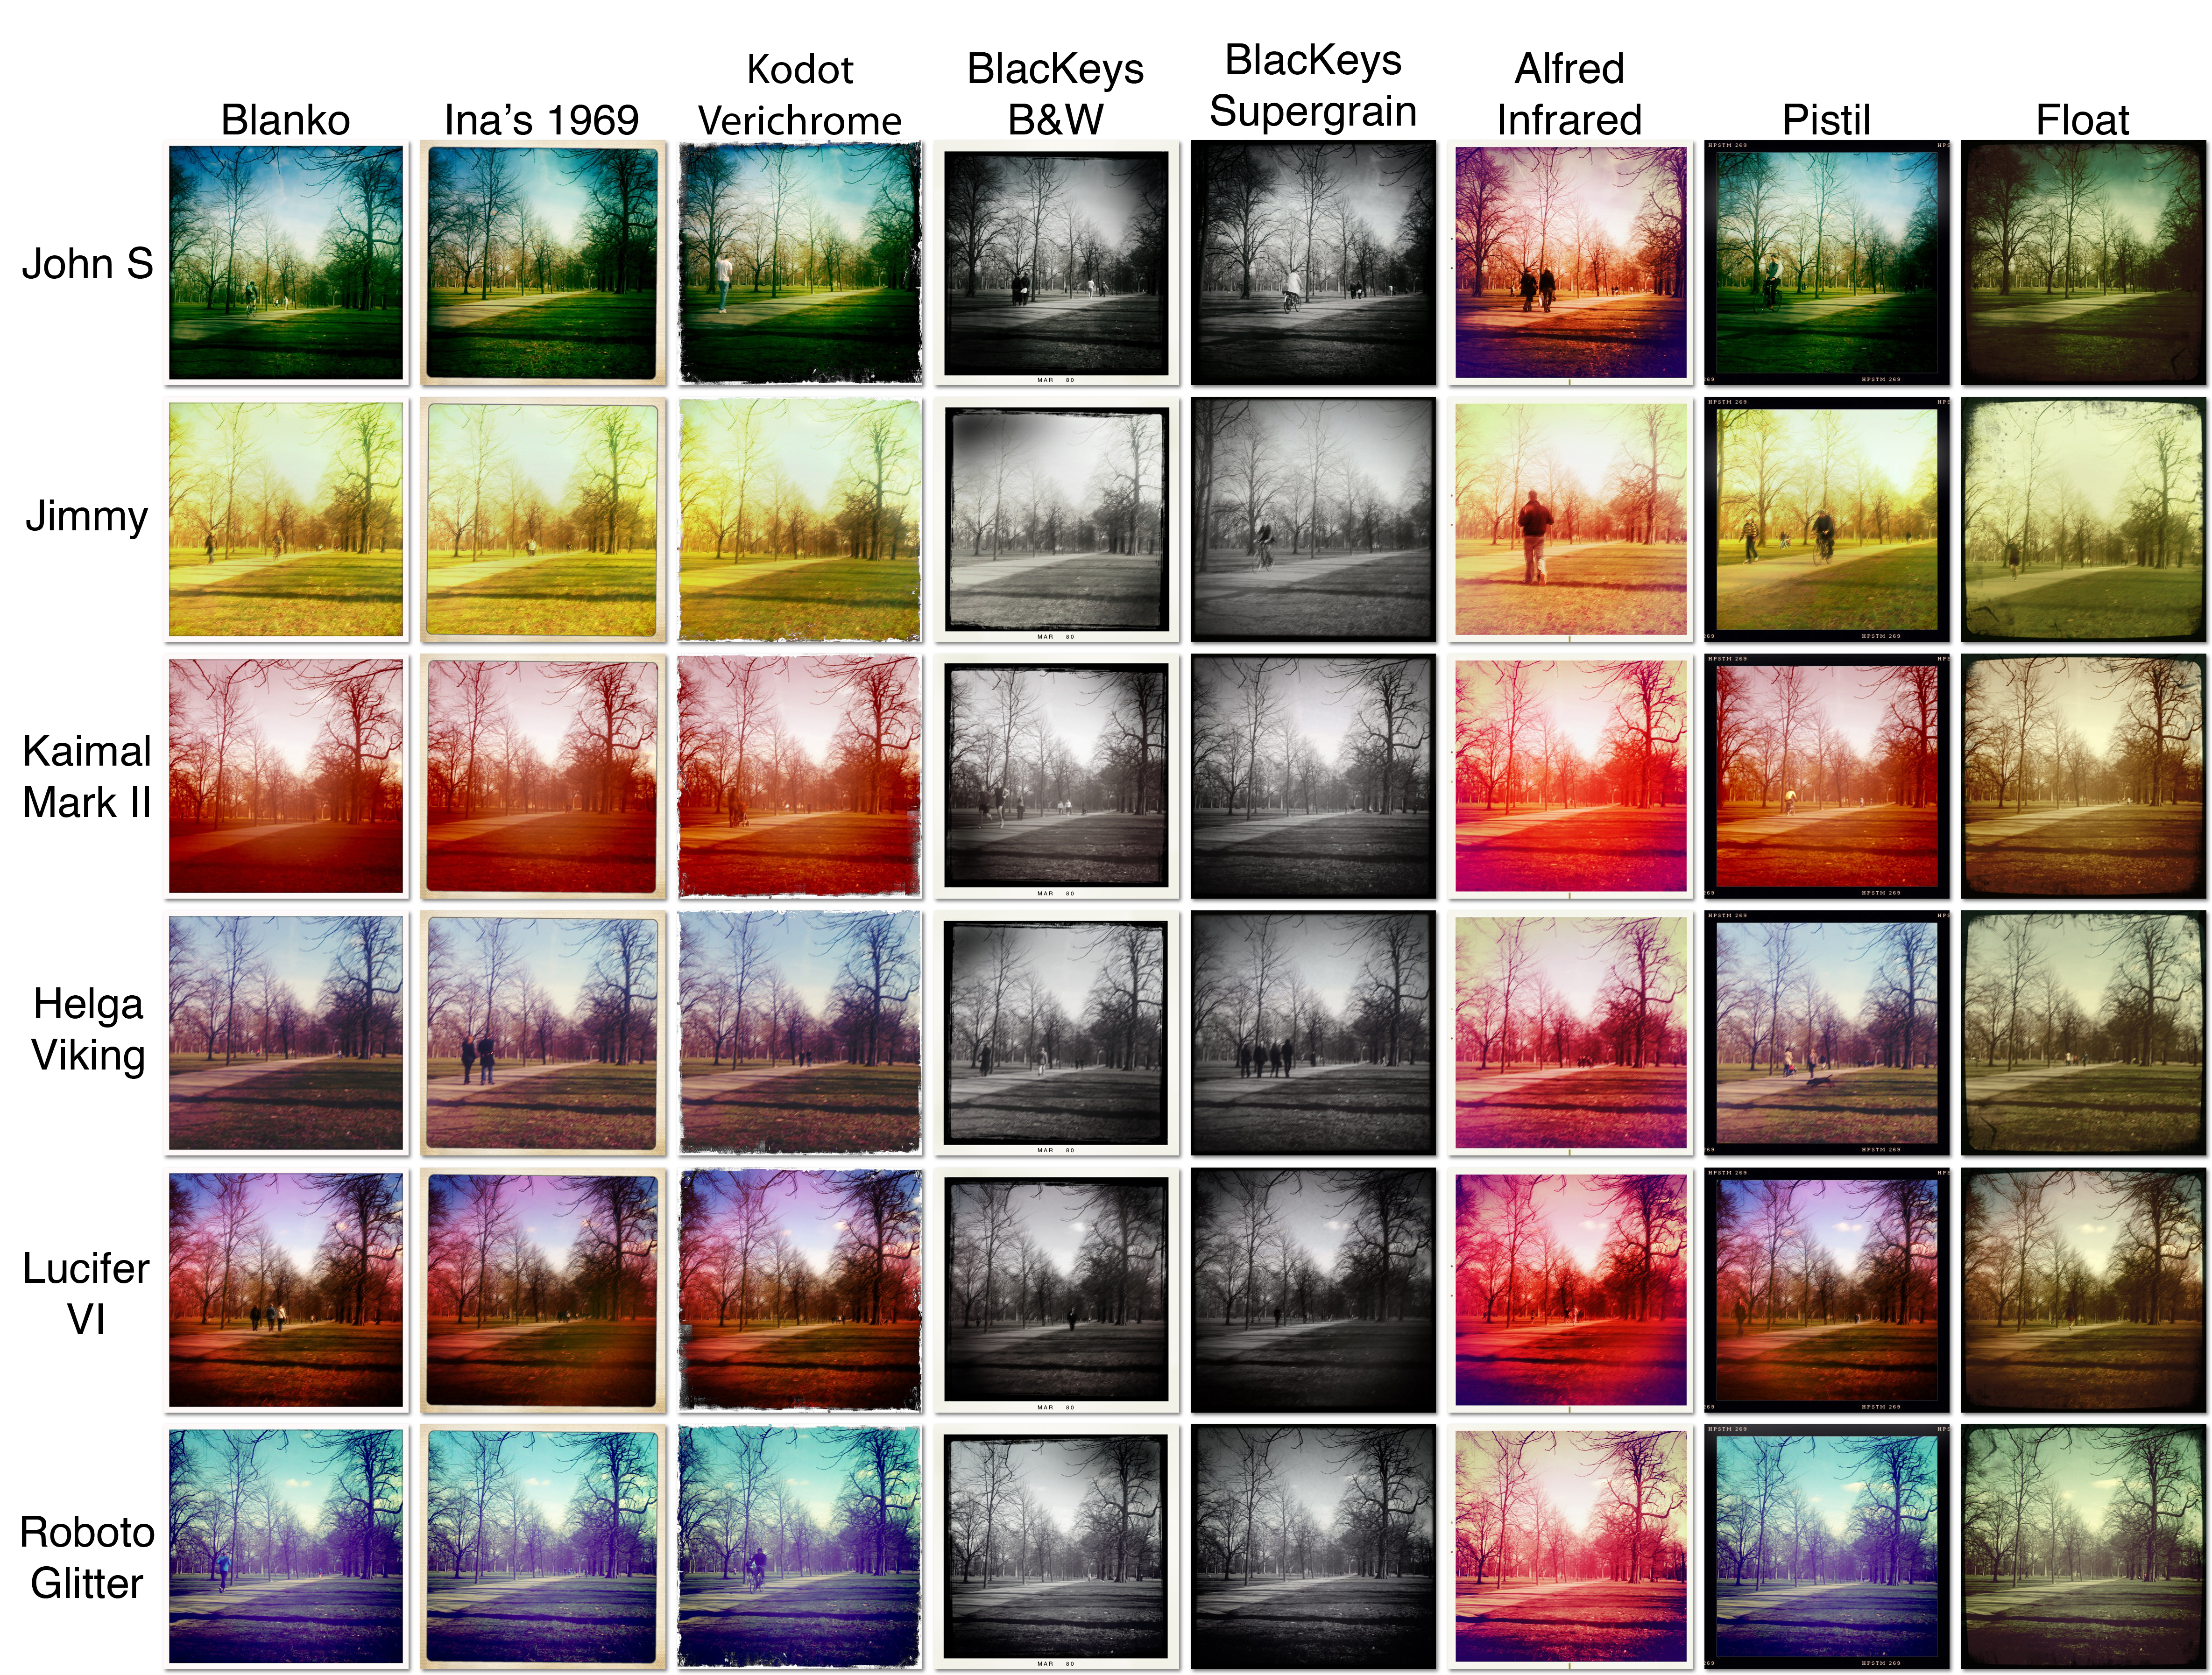
The presentation feels very much inspired by Hipstamatic, the icon and interface sharing a love for old school camera design. Processed prints slide onto the screen Polaroid-style over a classy black leathery background bearing the logo. It applies effects to both photo library images as well as those taken in-app (although there is no stylised viewfinder a la Hipstamatic) and almost all the effects are of the ‘toy camera’ ilk, featuring colour filters and Holga- and Lomo-alikes as well as some that play with cropping and faked multiple exposures (although these aren’t particularly good, more on this later).

The options available include 24 basic image filters, 20 frame styles, the ability to add text in a number of fonts and sizes, a range of light leak and grunge effects which add considerable character to your images, and individual red, green, blue, brightness and contrast controls that allow you to tweak the filter presets. There’s also an option to add either the date or your name to certain frames in addition to the text option (the date used is the date you processed the image in the app, not the date you originally snapped the source photo).

Here’s a look at those basic filters in a handy table:

Some really nice looks in there, but as you can see the last few filters are a bit weird, especially the quad styles as it’s a bit of a bodge. Rather than taking 4 images in succession to use, it takes your single shot and uses it four times, cropped and zoomed automatically. I think these filters are a nod to the likes of the SuperSampler plastic Lomo cameras, but if you’re after this sort of thing on your iPhone get QuadCamera, which is superb. Similarly the Multiple Exposure filters take your single shot and chop it up, flip it around and superimpose it on top of itself. It can be effective, but it’s a shame you can’t superimpose a selection of your own images.

But of course that’s not all. You can apply one of the 20 available frames to your filtered photo (or leave it naked):

Added to that are a range of ‘light leak’ and noise/grunge effects – life’s a little too short to make a table of all of those as well, but you’re sure to find something you like in there and as with the other features you don’t have to use them at all if you don’t want.

It’s easy to get exactly what you want without having to experiment too much with combinations. Preview images load quickly so you can flip through them manually, or pull down a handy list (that carries a thumbnail example of each) to jump straight to the one you want. There’s also a Shuffle button that quickly delivers a random combination for you to save or discard before hitting it again for another offering.

Here’s a selection of images produced by the random generator that I liked, including some light leak and noise effects:

Output and sharing options are generous, with options to send to Twitter, Facebook, Flickr and Blogger, your email or camera roll, and offering a range of image dimensions to suit all models of iPhone. An image processed at full res (2048 pixels tall, only available on the 3GS or newer) took about 8 or 9 seconds to save to my photo library. The next res down (1600 pixels tall and perfectly useable), took about 5 or 6 seconds, and lower than that (400, 600 and 800 pixels tall) you start to get into the realm of email and web-friendly resolutions that lack the detail you’ll want for your keepers.

I still think Hipstamatic has the edge in some aspects. For example, whereas two consecutive photos taken with Hipstamatic’s films and lenses will rarely have exactly the same vignette effects, in PictureShow most of the grunge and light effects appear the same from photo to photo, occasionally being rotated. This is most noticeable using coloured light leak effects when a B&W filter is used, as the leaking colour isn’t muted by the filter.

Another niggle is the inability to switch off the weaker filters when generating random effects. I’m thinking particularly of the ‘quadrant’ and mirror filters and the film sprocket frames, which I will never use. This is something that other apps such as CameraBag and ToyCamera allow and it would be a very welcome addition. The buttons at the bottom of the screen for switching between the editable parameters are a little fiddly to select, and placing any text precisely can be a pain as it appears directly under your fingertip, obscuring the exact placement. Finally, it could really do with updated visuals for the iPhone 4 screen as at the moment everything is a little pixellated, including the image you’re editing – although the images saved to the photo library look great. Pictureshow is now Retina-friendly!

Overall, the proof is in how much you use the app and how pleasing the results are and on that score PictureShow is a winner as I’ve been using it a lot. Packed with a good range of filters and effects, output and sharing options, as well as an appealing and fun attention to detail in the design, I heartily recommend it.

Categories
Editorial Photographic

neil marshall’s ‘centurion’ is out now!

Over the last year or two I’ve become quite good friends with Axelle Carolyn through some short films we’ve worked on together, and a couple of modelling sessions she did for me. Axelle is married to Neil Marshall, director of Dog Soldiers, The Descent, and Doomsday, and this month his latest, Centurion, was released. I was lucky enough to be invited onto the set for a day last year where I witnessed numerous unpleasant sword-based deaths being administered by Mr Sam Worthington, and the film is definitely on my ‘Must See In The Cinema’ list.

Anyway, it’s a good excuse to re-post this cracking portrait of Neil that I took last year in the Coronet Cinema in Notting Hill, London. I was actually there to photograph Axelle but Neil fancied a couple of shots too. It’s lit with one SB-800 flash to camera right, with a Lumiquest Softbox III on it. Ideally I’d have liked another flash camera left to give a bit of rim-light kick but we had so very little time in the location.

Categories
iOS & Mac reviews Reviews

hipstamatic: a wonderful toy camera app for iPhone

(UPDATE: if you’re reading this you might be interested in a Photoshop action I wrote to sort of emulate the look of these retro camera styles – have a read of ‘my Hipstamatic effect for Photoshop’ after you’re done here. Okay, as you were!)

I recently went off iPhone photography for a while. I’d set myself the goal of uploading a new iPhone photo every single day to my Tumblr blog and within a few months it became a kind of millstone around my neck and so I went off iPhone photography for a bit, had a clean-up of apps I never use and cleared out the thousands of photos in the filmroll which was slowing the camera dooown.

A few weeks later I’m sort of getting the itch again. Just a tingling really, nothing to see the doctor about. Well, I had a little look in the photography section of the App Store the other day, not to buy anything you understand, just to see if there was anything new and exciting to play with and clicked on Hipstamatic (App Store link) almost by chance really. There’s quite a lot of Lomo and Holga style apps already, and I felt like I had got one of the best in ToyCamera. Hipstamatic’s icon isn’t flashy, but the name is catchy and it had a great rating, so I gave it a go and I love it.

It’s so fun to play with and use. The way it works is that you have the basic Hipstamatic ‘body’ and you select a combination of one lens and one film, then optionally charge up one of four ‘flashes’. The display has two ‘sides’, the front and back of the imaginary Hipstamatic camera, styled after the Instamatic range of cameras. Along the bottom of the front display are buttons allowing you to change the film, flash or lens, buy new packs from the shop or flip to the back screen. Alternatively you can swipe the lens to swap in the next available lens. On the back is a small squarish live viewfinder, the flash charger and the huge yellow shutter release button, and if you shake the phone you get a completely random setup.

So you select your film, lens and optional flash, take the shot, then wait a few seconds while it ‘prints’ the shot and saves it into the iPhone camera roll as well as the app’s own gallery. Tapping the gallery button takes you into a gorgeous gallery display where you slide through your recent prints. Tapping one flips it over to reveal the lens, film and flash settings. From here you can copy the settings for your next shot, share it through Facebook, Twitter or email, bin it or enter it into one of the regular contests the developers run.

A full kit comprises 8 films, 6 lenses and 4 flashes but the app comes with only 3 lenses (John S, Jimmy, and Kaimal Mark II), two flashes (Standard and Dreampop), and two films (Ina’s 1969, and Kodot Verichrome) as standard and further expansions cost 59p per ‘Hipstapack’. Each pack usually contains at least one lens and film, and occasionally an extra flash and purchasing them takes you into a custom-built store with it’s own gorgeous graphics. I really love all this attention to detail.

So it’s a pretty slick app!

The fact that you can combine any film with any lens means that theoretically you’ve got 48 different looks available, plus even more variations on those by using one of the different flashes which basically just apply a splash or wash of colour or ‘light’ depending on what you use. In practice, however, a few of the different looks are all but identical apart from the frame applied. On the other hand, something I really liked is that while other apps often have a set vignette effect that doesn’t change much if at all from shot to shot, Hipstamatic appears to have quite a variety available meaning it’s rare to get exactly the same vignette effect on two consecutive shots using the same settings. That’s a nice touch and really adds to the realism of the effect.

In the name of testing these effects, I spent 20 minutes crouched in Hyde Park trying each and every combination on the same scene. You better appreciate this:

Rows are the lens effects, columns are the film effects

If you’d like to see it in much greater detail, the original is available to download from Flickr here – a 12MB download but each image is original resolution.

As you can see, the first three films are identical except for frame, and I hope you can see what I mean about the slightly naff Kodot frame! B&Ws are also pretty similar, and although the blurb for the first BlacKeys film says it prints the date on, the only date I’ve ever seen is MAR 80 so I’m not too sure what’s happening there. Nice frames though, and my favourite film of all of them is the last one, Float. I love the smudgy contrasty vignette and artifacts it produces.

In terms of the lenses themselves there’s a good selection of looks no matter your taste, although John S is the one I find myself going back to most often. Don’t forget to experiment with all the films though. For example, the severe yellow look of Jimmy doesn’t do much for me until it’s paired with the Float film and you get a nice slightly faded off-green look. On the other hand, Kaimal turns everything a bit too red, and again the Float film saves the day, pulling it all back a bit.

It’s almost churlish to moan about something with such variety and charm, but… as I touched on above the two films that come with the basic pack and a third from the premium packs are exactly the same in terms of colour processing with the only difference being the frame they apply. The premium of these, Kodot, has a really fake looking scrappy frame which I think is the poorest of all 8 films. While I’m being picky, the two B&W films also seem pretty similar except for the frame despite implying in the name that one offers more contrast.

I only noticed when having a look close-up that several of the lenses (Jimmy, Helga and Lucifer) aim to recreate the imperfect toy-camera look by ghosting the image and you end up with what looks like camera shake on a long exposure. I’m not a fan of that as I’d rather they just slightly softened the image around the edges rather than make me look like I’ve got the shakes. It’s a shame as Helga and Lucifer in particular produce some lovely colouring.

I’m critiquing on a very personal level but hey, I’ve used a lot of Lomo-like camera apps and spent many an hour tinkering in Photoshop creating similar looks for own DSLR images so I knows what I likes. So I’ve got a couple of reservations, but I love this app as much for it’s fun interface and the huge variety of looks it produces as for getting me back into iPhone photography. This is well worth your cash, folks, and to give you a flavour of how it performs on scenes other than Hyde Park, here’s a few more shots I took the same day.

Cheers for reading!

Categories
Gear & gadget reviews iOS & Mac reviews Reviews

these are a few (more) of my favourite things

Who doesn’t love using cool stuff to make their day to day survival more pleasing and less hassle? I’m sure I’m not the only one who’ll trawl the interwebz looking for cool stuff to buy or install, in the name of streamlining or at least aesthetically enhancing my workflow or daily routine, or just because its… well, cool.

Here’s a list of cool stuff I use at the moment, none of which falls under any particular category. Consider it more of a Buffet of Cool. Fill your plate with as much or as little as you like and do feel free to pitch in with some of your own Discoveries of Cool.