Categories
iOS & Mac reviews

iPhone review: Stow – a slick packing checklist app

stow packing app

I like apps that do one thing really well, which is the main reason I really like Stow (£1.49), a checklist app dedicated to packing for a trip. I’ve already got plenty of apps that could fulfil that function such as Drafts, Simplenote, Things, or Reminders, but they’re all either too general and lack features, or are focussed on different sorts of checklists.

If you don’t travel much then any one of those apps would do the job for the occasional packing list but Stow provides certain features dedicated to the needs of the regular suitcase lugger like template lists, weather-specific suggestions, a departure countdown, list-sharing options and a button to ‘unpack all’ when you arrive at your destination so you can check it all off again before you return, which is very handy.

It even automatically adds the right number of underpants and socks based on your travel dates – unless you tell it you’ll be doing laundry while you’re there.

The app has a clean look and feel, using left and right swipes of the screen when in List mode to bring up more options or add new items, with a few of the most important functions in a bar along the bottom of each screen. It’s cannily avoided going the skeuomorphic route so it’ll fit in well with iOS 7 – although the icon is a deliciously pushable button.

Flexibility

While Stow would evidently be very useful for the frequent traveller, I don’t travel that much. Instead, I got Stow to see if I could use it as an equipment checklist when I’m packing for photography shoots. I’ve taken a few minutes to pretty much empty the pre-loaded item pool, removing all the stuff for golf, ski and city trips, adding a new category called Camera Equipment and filling it with every bit of kit I own from cameras and lenses down to tripod mounting plates. Then I saved a new template list called Photo Shoots that contained the lot, plus a few other essentials like ‘phone’.

Now when I have a shoot I fire up Stow, start a new ‘trip’ and pick the Photo Shoot template. It loads all those items into a new list and I remove any that I’m not going to need for this particular job. In future I might create more specialised template lists; for example, a portrait shoot will likely call for my strobes, lighting stands, umbrellas and softboxes, whereas on a unit stills job I can leave all that lot at home but I’ll need to remember my Sound Blimp.

Again, it’s nothing I couldn’t have tapped into Reminders or even done with a pencil and paper but knowing that I’ve got all my kit saved into Stow’s list templates reassures me that I’ll not forget to add something obvious to my list, like I might if I was having to write it out fresh each time.

Niggles

There are a few little bugs and niggles that still need ironing out. For example, sometimes Packed checkmarks don’t display when you reload the app, but reappear when you switch to the ‘unpacked’ or ‘everything’ tab and back; I occasionally had trouble getting the ‘hold to delete’ function to register my touch correctly, and when adding items to a list sometimes the counter next to each item would zero as I scrolled down past it.

The item name rows are quite short, only displaying 13 characters in the item pool screen because of the add and remove buttons, so if you’ve got a lot of items with long names (such as ‘Nikon 24-70mm f/2.8 lens’) you’ll have to use some abbreviations (such as ‘Lens 24-70’) to make it easier navigating the list.

Everything is ordered alphabetically which is definitely the best default but I’d like to be able to tap an Edit button and move things around if I want. For example, I’d like to be able to put my cameras, batteries and memory cards together at the top of the list. This is possible with a bit of crafty renaming to game the sorting system but it’s messy.

A bigger bother for me is that you can’t tap the iPhone status bar to jump back to the top of a list. I found myself trying to do this again and again, particularly at the bottom of a list and wanting to search for the next item – Search is at the top, so you have to ‘swipe and swipe and swipe and swipe, and type’, instead of ‘tap, and type’. Annoying.

To conclude

Despite those niggles I do really like Stow and it’s definitely worth a look if you’re after a packing checklist app. It’s not quite what I was looking for (an equipment checklist app specifically for photographers) but its customisability let me bend it to my needs while taking advantage of all the packing-focussed features, and the design strikes just the right balance between simple and clever in an iOS7- friendly package. And as a bonus, next time I go on holiday I’ll already have a packing app ready to go.


Categories
Photographic

Lightroom 5 is out, with Smart Previews

Lightroom 5 is out, which I wasn’t expecting! A few big new features that are in their press release, but the big one for me is Smart Previews which could remove the only problem I have with LR: the ability to easily and quickly work on a subset of files from my laptop while keeping the main Library on my iMac, without tedious exporting and importing of huge RAW files.

I’m a recent convert to Lightroom and love it. I tried it back in Version 1 but didn’t like how it treated RAW files – I had my Nikon DSLR set up to create a certain look, which was great for JPGs but obviously LR applied a basic preset that stripped that look, and I could never recreate it to my satisfaction.

I learned a few months ago that there’s now built-in Nikon presets that match that look perfectly, so I jumped in with Lightroom 4 and haven’t looked back; it’s obsoleted Nikon Capture NX 2 for RAW conversion, and Photo Mechanic for importing and cataloguing, although I still hang on to PM for comfort as it’s an excellent tool for both those functions.

You can get Lightroom 5 from Adobe here, as an upgrade or a full price app, or as part of Adobe Creative Cloud.

Categories
Editorial

Chicago Sun-Times just sacked every single staff photographer

Holy shit. 🙁

The Associated Press reports:

The Chicago Sun-Times laid off its entire full-time photography staff Thursday, including a Pulitzer Prize winner, in a move that the newspaper’s management said resulted from a need to shift toward more online video.

The union representing many of the laid-off photographers plans to file a bad-faith bargaining charge with the National Labor Relations Board, a union leader said.

The Sun-Times Media company didn’t immediately comment on how many jobs were affected, but the national Newspaper Guild issued a statement saying 28 employees lost their jobs. The layoffs included photographers and editors at the Sun-Times’ sister publications in the suburbs.

As someone in the comments suggests, you can put ads in front of video, and you can run photos taken by amateurs in the street on their phones (likely without paying for them), or get something from one of the big three agencies.

A sad sign of the times, especially for people like me who make money as photographers, albeit not for news. Personally I loathe video on news sites, except in some cases such as a natural disaster where pictures somehow can’t convey the ongoing chaos properly. I much prefer some well-chosen photos and some well-written text, both much quicker to read. I’m 37 – is my dislike of news video a sign of my age?

Source: The Guardian

Categories
Editorial

Focus on the art

I read an interesting article by Tobias S. Buckell on the truth about making a living as an author. I’m not an author but pretty much all my income comes from creative arts, mainly photography, and what he has to say rings true to me too:

I’m playing the long game. And maybe I don’t know what I’m doing, I’m pretty open to that, but I’m always happy to report on what’s going on. Each successful career I’ve seen, though, requires a ton of hard work, and many people I see trying any method with a focus on shiny and new and ‘beating’ some system often flame out and fall away. Lots of people who’re doing the right thing and working hard flame and fall away too.

Making a living off art is hard.

But that isn’t a sexy sell.

That isn’t to say you should give up. Fuck that. But I am going to say: get ready to work, don’t expect riches. Focus hard on the art.

And pay attention to those charts and adjust your expectations accordingly.

I’ve taken some hard knocks and setbacks in my pursuit of a photography career but these words are valuable – keep working hard, keep plugging away, focus on the *art* first and foremost.

Source: Survivorship bias: why 90% of the advice about writing is bullshit right now
by Tobias S. Buckell

Categories
iOS & Mac how-tos iOS & Mac reviews

How to add text to Instagram photos with Over (and Photolettering)

Instagram text 06Recently I’ve often found myself wanting to add a bit of amusing or descriptive text to a photo I’m tweeting, sending to friends or posting to Instagram. Of course, there’s no option to add text to Instagram photos within the app itself, so you’ll need to look to other apps.

I did a little asking around and two apps came back in recommendations so I gave them both a good go. After a few short bouts there was a conclusive winner, which I will now present to you by employing an over-stretched boxing metaphor:

The Contenders

In the Red Corner, suggested by friends, we have Over ($1.99), a Universal app which includes 30 eyecatching and fun fonts and offers dozens (and dozens!) more ‘standard’ fonts for a single in-app-purchase of 99c. To be fair, you can easily do without these as the ones included are great.

In the Blue Corner, recommended by no less than John Gruber amongst others, we have Photolettering (Free), an iPhone-only app which offers 3 fonts at first, with 20 more fonts available to purchase for 99c each, or $9.99 for all 20. The complete set is comparable in style and diversity to those included in Over.

Round one – value for money

On this basis Over clearly wins. Photolettering might be free but buying its full complement of fonts will run to five times the price of Over’s basic cost, and Over still has more choice. Furthermore, the three basic fonts it comes with are pretty bland.

It could be that for what Photolettering is offering, their ‘buy everything’ price is more realistic and fair to both them and the customer, and I’m all for that. But Over offers considerably more variety for the same price Photolettering charges for just two extra fonts, let alone Over’s vast range of standard fonts included in the single in-app purchase available.

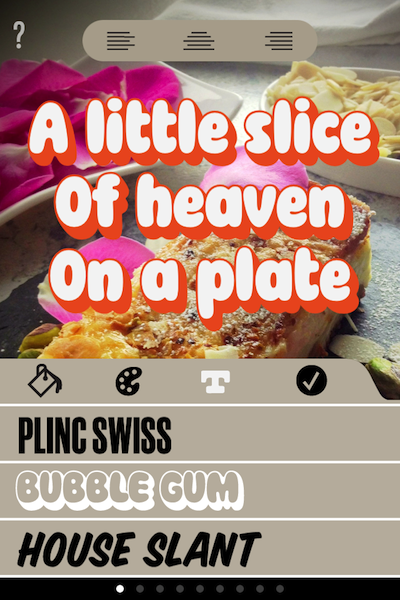
A selection of Over's thirty available fonts The three fonts that come free with Photolettering

Round two – functionality

This is more evenly matched with each app offering some unique features, as well as the usual standards they both share such as social sharing, and a postcard function via Sincerely.

On the ‘unique feature’ front, Photolettering lets you rotate text easily using two fingers, something Over doesn’t offer at all. It also offers several two-tone fonts and control over each colour, background colours (if you don’t want to use a photo), and a choice of three basic filters which amount to Sepia, B&W, and Vivid.

On the other hand, Over offers multiple layers of text, meaning you can place several different text elements on your photo and style each one differently. It also includes a crop tool which only has one shape – square – but is perfect for setting up an image for Instagram, and the ability to darken the background photo to give your text some pop.

Photolettering has a crop tool, but only at the end of the process, and only if you decide to send to Instagram, so if you’re wanting to post it you need to plan for that as you add your text.

If you try to load in a pre-squared image, add lettering and then post to Instagram, Photolettering still forces you to crop a portrait-shaped image out of it, then add the text, then crop a square image out of that. You can avoid this by pinching the square image size to fit into the portrait crop, but the whole process is pretty ridiculous compared to how Over offers the same tool.

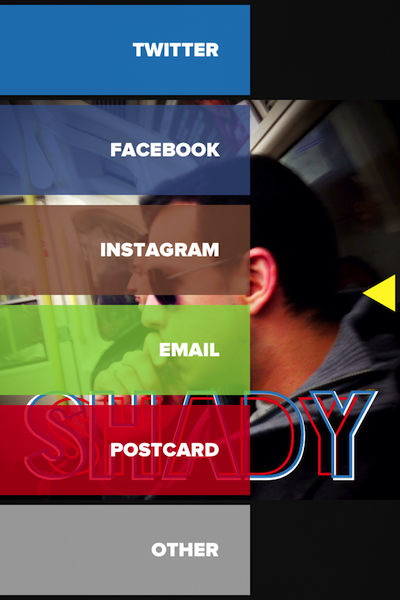
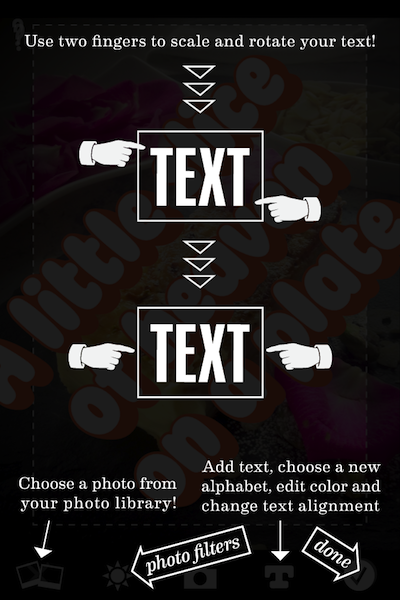
The sharing screen in Over A tutorial screen in Photolettering

Round three – experience

Okay, ‘experience’ is a little fancy-sounding, but that’s what we love about apps, right? How fun, easy, intuitive, and satisfying they are to fiddle with?

Photolettering is by far the plainest app, both in presentation and workflow, with one text layer and a simple tab-based navigation. It’s functional, it gets the job done – and you can rotate text, which is cool, but the whole cropping/Instagram process it uses is pretty dumb.

Over is much more stylish with a slick dial-based navigation and semi-transparent menu overlays. The dial can be a little disorienting at first, and they waste ‘More’ on an advert page for other apps, but the overall effect was more compelling.

But Over clearly wins the round with multiple layers that let you give every word its own font, position and colour, or create interesting effects by overlaying – something that works particularly well with the Blackout Sunrise font, and more than makes up for its lack of two-tone fonts.

Instagram text 06

Instagram text 01

The Winner

It wasn’t really a fair fight, was it? Over very clearly takes the crown for me. The only thing I’d nick from Photolettering is rotating text which sounds like a very update-friendly feature to me, hint hint.

So for all your text-on-iPhone-photo fun, my hearty recommendation would be to check out Over ($1.99) on the App Store.

Thanks for reading!