Categories
iOS & Mac how-tos

How to sync your Colonization save game on a Mac

I just got stuck into Civ IV: Colonization for Mac after it was on sale on Steam (although it’s also available on the Mac App Store if you prefer), and I’m rather enjoying it. I’ve got Civ IV and V and they’re great games but I’m not very good at them and I’m really enjoying the smaller scale and more focussed victory conditions of Colonization. However, I’d like to not necessarily be tied to my iMac in the study, lovely as it is. Sometimes you just want to grab a laptop and hunker down on the sofa next to your loved one who insists on spending the day watching guff on Netflix… 😉

Unfortunately Colonization doesn’t support SteamCloud for savegame syncing. Dropbox to the rescue! If you’ve seen my guide to syncing XCOM save games using Dropbox this is pretty much the same deal, but if you’re new to this, read on.

(By the way if you’re trying to achieve this on a PC I’m not sure how symbolic links work on PC, but if you can work that out the principles are the same.)

Dropbox and symbolic links

First you’ll need a Dropbox account. It’s free and it’s awesome, and if you don’t already have an account use my links to sign up and we’ll both get some bonus space, which is nice!

Next up you’ll need to get ready to use symbolic links. In short, when you move a file from one place to another you can leave a little ‘map’ (a symbolic link, or symlink) in the original location that seamlessly redirects the operating system to the new location as if nothing had moved. You can read more about how symlinks work in my post here, and when you’re ready to set up the service you can get instructions from here. It’s also possible to leave a symlink behind using Terminal, but the symlink tool is sooo much easier!

Got those set up? Nice, here we go:

Move the Colonization saves to Dropbox

On a Mac you’ll find them in the User -> Documents -> Aspyr -> Colonization folder. Note that while all we really need is the Saves folder, it’s much easier to work with the entire Colonization folder.

sync colonization saves mac

Grab the folder and move it on your hard drive to your Dropbox folder. To keep things in some sense of order I have a ‘Documents’ folder in Dropbox, so I created an ‘Aspyr’ folder in there and moved my original ‘Colonization’ folder there, so it now resides in User -> Dropbox -> Documents -> Aspyr -> Colonization.

Create the symbolic link

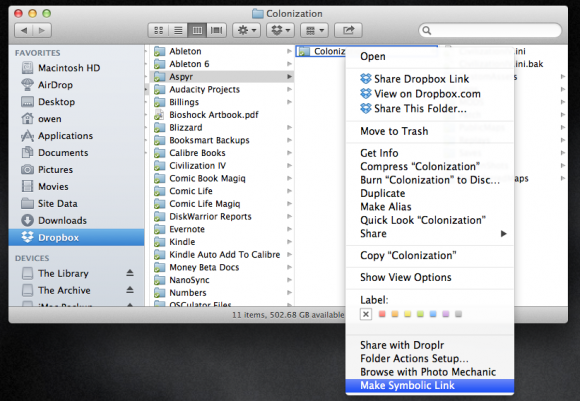
Now we need to tell the computer (and the game) where to find the folder since we moved it. Select the ‘Colonization’ folder in it’s new location, right-click and select ‘Make symbolic link’. It will create a new file called ‘Colonization symlink’ – it’s actually an Alias, as depicted by the small curly arrow on the icon.

sync savesgames colonization mac

Now move that symlink back to the original location, so Users -> Documents -> Aspyr. Once there, edit the filename to remove the ‘symlink’ element. Now wait for Dropbox to update the folder to your other computer.

Tell your other Macs about the new location

Now you need to tell your other Mac about the synced savegames. Find the newly-synced Colonization folder in your Dropbox on the other Mac and create a new symlink to it as before, then move that symlink into that computer’s Documents -> Aspyr location described above, delete or rename the one that’s already there (assuming there are no saves in there you want to keep!), and rename the symlink to just ‘Colonization’ again.

All done!

Now you should now be able to save a game on one Mac, quit the game, launch it on another Mac a few moments later (after Dropbox syncs) and fire up that same save.

A couple of words of warning – don’t run Colonization on more than one synced Mac at the same time or when you come to save it will get very confused and not know which updates to sync, which to load, and it gets messy. Secondly, if you decide to move the ‘Colonization’ folder inside Dropbox for some reason, be sure to create new symlinks in the new location and replace the old ones so the game doesn’t get lost!

Hope this helps – happy colonising! (I’m British, we use an ‘s’…)

mac-app-store-download

Categories
iOS & Mac how-tos

How to sync Mac XCOM saved games using Dropbox

UPDATE: XCOM is now available on Steam for Macs, but beware – it’s not the Elite Edition. You can buy the standard edition and the relevant DLC from Steam but at regular prices it’s cheaper to just buy the Elite Edition elsewhere. If you want to sync your saves over Steam, that’s the version to buy. If you’re using the non-Steam version, read on 🙂

ORIGINAL STORY: XCOM: Enemy Unknown – Elite Edition for the Mac ($50 on the Mac App Store) is not available on Steam and doesn’t use iCloud so there’s no way to sync your saved games between multiple computers running XCOM. Don’t despair! Here’s how you can use a free Dropbox account to do just that.

First off, this is all much easier if you install the Symbolic Link service I wrote about in this post, otherwise you need to use the Terminal command line. If you know how to create symbolic links in the command line and prefer that method, go for it, but this tutorial assumes you’ve installed the symlink tool available here.

You’ll also need a Dropbox account with a few MB free to store the XCOM SaveData folder. If you don’t have one, a basic free account is all you need and you can even get a bit of extra storage by signing up via my links.

Locate the Mac XCOM saved games

First, choose the computer which contains your ‘master’ saves, the ones you want to sync to other machines. They are stored in the Application Support folder, which lives in the user’s Library folder, which is hidden by default. To open it, in the Finder select the Go menu, then hold down Alt and select the Library item which appears. Now navigate to Application Support -> Feral Interactive -> XCOM Enemy Unknown – Elite Edition’.

Alternatively, from the Finder type Command-Shift-G and enter ‘~/Library/Application Support/Feral Interactive/XCOM Enemy Unknown – Elite Edition’ and press Return.

See the SaveData folder in the XCOM folder? That’s what we’re going to sync in Dropbox.

Move the saved games to Dropbox

Now open up your Dropbox folder in a second Finder window, for ease of dragging-and-dropping. It doesn’t matter where in Dropbox you move the SaveData folder to, but because I have a few apps using this syncing system I’ve replicated the Library -> Application Support -> ‘ApplicationName’ folder hierarchy so I can always find things later.

Drag the SaveData folder from the XCOM folder into your chosen location in Dropbox, making sure it’s moved rather than copied.

Now right-click the SaveData folder in its new home in Dropbox and select ‘Make Symbolic Link’ in the contextual menu.

Move the newly-created symlink (which will probably be called ‘SaveData symlink’) back to the original location in the XCOM folder in Application Support, then edit the name so it just reads ‘SaveData’.

Set up your other computers

On each computer you want to use, find the newly-synced SaveData folder in your Dropbox and create a new symlink to it as before, then drop that symlink into that computer’s XCOM Application Support location described above, delete the one that’s already there (assuming there are no saves in there you want to keep!), and rename the symlink to ‘SaveData’.

That’s it!

Now whenever you manually save in XCOM the game saves to the SaveData folder in Dropbox; once the new save file uploads to DB you can continue the game on any Mac or PC you link to your DB account.

A few notes:

• this doesn’t sync AutoSaves so remember to manually save before you quit;

• if you later move the SaveData folder to another location in Dropbox you’ll need to recreate the symlinks or they’ll stop working;

• finally, with this unofficial method of Dropbox syncing it’s usually advisable to only run the app on one computer at a time in case conflicts are introduced, but it shouldn’t matter in this case as saves are only read once while loading so technically you shouldn’t need to worry about it.

You’re all done – enjoy!

mac-app-store-available