Categories
Featured iOS & Mac how-tos iOS & Mac reviews

How to put two photos side by side in Instagram

instagram collages with DipticWhenever I need to make a photo collage on my iPhone, or put two screenshots side by side for a blog post, I use Diptic (99¢). It’s easy to use with plenty of options and sends your creations to pretty much anywhere you can think of, including, of course, Instagram.

It’s Universal too, and works great on the iPad, or Diptic for Mac (99¢) is also available if you’d prefer to make collages from the comfort of your laptop or desktop Mac.

Check Diptic out on the App Store, or read on for my quick review of how the app works.

Getting started with Diptic

To start making collages, launch Diptic and pick a layout. All the layouts that come with the app produce a square collage, as befits something destined for Instagram, but the range of photo frame shapes and sizes that fit within that square is wide enough to meet most needs, starting simple and getting as fancy as stars in circles – you can even start dragging the frames around to make new shapes that fit your photos.

The frames themselves can be tweaked all sorts of ways, including roundness of corners, colour and thickness, or using a texture. Want your frames to sport a classy zebra-skin effect? No problemo…

instagram-collage-montage-Diptic-1

What if you want a rectangular montage, comprising two square photos side by side for example? Well, then you’d have to purchase an upgrade to unlock an aspect ratio control.

There’s a variety of in-app purchases in Diptic: new sets of layouts, new textures for the frames, and the aspect ratio control. All these are 99¢/69p and none are essential so it’s fair enough, but if you really want to use Diptic for anything aside from Instagram I recommend getting the aspect control as it’s really useful – I used it to put the two screenshots above together as one image.

Adding and editing images

Adding photos to your collage is as easy as shooting them for each frame, or choosing from your Photo Albums, Facebook or Flickr. Once in place there’s a handful of editing options (brightness, contrast, saturation and tint) and a whole range of filters that can be applied to individual snaps, useful if you used the camera in-app to fill a frame. Any blank frames you want to keep can be filled with a colour if you like.

instagram-collage-montage-diptic-2

There’s also some limited options to add text to your photos, offering a variety of fairly standard fonts, outline and drop-shadow effects, rotation and background. It definitely does the job, although if you’re looking for funkier fonts and more options for adding text to iPhone photos take a look at an app called Over (read my review of Over here).

When you’re finished you can save and upload your collage right from the app, to Instagram, Twitter, Facebook, Flickr, Tumblr or Twitter; or export to any compatible apps you have installed. Recent updates have even added the ability to order a postcard and mail it anywhere in the world using Sincerely.com.

diptic-instagram-collage-montage

Plus, it’s Universal so you get the iPad version thrown in. There’s me using it to throw together something a little different with a couple of photos from my day job as a TV camera operator.

In conclusion

Diptic is by far the most popular option for creating photo collages on your iPhone or iPad, with good reason. I keep it installed because of the easy-to-use interface and the flexibility of creating non-square collages, which are good for so many more places than just Instagram. And don’t forget to give the Mac version of Diptic a try too!

app-store-downloadmac-app-store-download
Categories
Other how-tos

how to customise an iCade stick and buttons

A couple of days ago I wrote about my new iCade and how much fun it is, but that I don’t like the stiff, clicky buttons or the way the stick can slip into the diagonal directions too easily. The parts I ordered to improve the experience have arrived so in case you fancy trying the same thing, here’s a guide on how to fit them; click on any photo to enlarge it.

The new parts

icade mod sanwa

Clockwise from top left I have:

  • Sanwa Ball Top Joystick JLF-TP-8Y – I went with Pac Man yellow for my ball top, but the original red iCade ball will fit too. Make sure when ordering that you don’t get the widely-available 8YT version as that comes with a metal plate attached which is apparently a pain to remove. If you’re interested in what the letters and numbers in the name mean, there’s a good explanation in this Shoryuken forum post.
  • 8 x Sanwa Snap In Pushbuttons OBSF-30 – these need a 30mm hole in the control panel to fit them whereas the iCade stock buttons are 28mm so you’ll need to widen those holes a little with sandpaper or a sanding tool. They have a slightly convex top and are far quieter with a much lighter tap required to trigger them. The lip around the buttons is pretty much the same size as the stock buttons so they should all fit okay. I went with red, yellow, white and black to match the iCade’s panel designs (didn’t fancy blue).
  • 5 Pin Joystick Cable JLF-H – one end plugs neatly into the new joystick. The other ends will need to be attached to the wires that currently run from the circuit board to the stock joystick, either by soldering or using a screw terminal. I went with the latter because I’ve never soldered anything in my life.
  • Sanwa Octagonal Restrictor Plate GT-Y – this is the ‘gate’ that restricts how the joystick moves. The joystick actually comes with a square gate that can be rotated 45 degrees (see my iCade review) but I’ve read that octagonal is the way to go for total control.

Total delivered from Gremlin Solutions: £50.36. Birthday, remember?

You’ll also need a few tools:

  • the hex allen key that came with the iCade (or similar)
  • Phillips screwdriver
  • small flathead screwdriver (if you’re using a screw terminal)
  • possibly a Security Torx screwdriver – my iCade control panel had two Security Torx screws but I read that other modders had no such screws in theirs. I guess Ion changed the design at some point. Security Torx heads are like regular Torx heads but with a pin in the centre that requires your screwdriver to have a hollow tip.
  • soldering kit or 5-way screw terminal
  • sandpaper or a Dremel sanding tool
  • a cable tie

Let’s get cracking

First we need to open the control panel. Remove the sides of the iCade and turn the control panel upside down to reveal the screws you need to remove.

icade mod guideicade components

There’s 16 in total, including those pesky Torx screws (if you don’t have them it’s just 16 Phillips head screws). Keep them in a dish!

Then rest the iCade on it’s back and lift off the panel carefully.

inside the icade cabineticade button switches

You need to remove the wires from the switches but before you do so draw a diagram of the underside of the board and note which coloured wire is attached to each button; they all have one black ground wire as well, you don’t need to note that.

Mine were tough little buggers to remove and nervous sweaty hands didn’t help, so I used my Leatherman pliers to grasp the necks of the metal clasps and tug firmly.

icade buttons modicade buttons guide

The black switches need to be removed next. Pull gently on the tall strut holding each in place and you can wiggle them out easily.

Finally unscrew the nuts and slide the buttons out; some of those blighters are tight but rest assured that none are glued on even though it bloody well felt like it.

Before you remove the joystick, take a look at the iCade’s circuit board; where the joystick wires are attached there should be the directions printed in tiny lettering on the actual board. If so, great. If not (highly unlikely) then before removing the stick take a note of which of the coloured wires is attached to each directional switch on the stick.

icade circuit boardicade mod instructions

Now pop the ball and dust protector off, remove the four screws and keep hold of them for later; then slide the stick out and cut the wires as close to the switch connector as you can so you have some spare when soldering/connecting.

icade control panel

The new buttons need a wider hole, by a couple of millimetres. I have no sanding tools so I got some sandpaper and did it by hand which was easy enough but took me about an hour, and boy did my wrist hurt the next day.

You’ll also need to sand the hole for the stick by a millimetre or so, to fit the lip at the base into it.

icade buttons replacement

The buttons clip in easily; make the re-wiring easy on yourself by aligning the buttons so the switches beneath line up the same way. Then, looking at the buttons so SANWA is printed the right way up, clip the appropriate coloured wire onto the left contact and the daisy chain of black wires onto the right contact.

The joystick is a little trickier. Technically it doesn’t matter which orientation you mount it so long as you connect up the wires appropriately, but our hand is forced because we need enough room to clip on the 5-wire bundle safely. The best position is to have the stick connector (or PCB) facing the iPad, towards the back of the case.

However, if we just rotate the entire stick to achieve this, the iCade’s screw connector gets in the way of the stick’s plastic moulding; you can see them sticking out either side in the first image below. Therefore, we have to mount the base with the protruding mouldings top and bottom. That would place the PCB on the left or right side, so we have to rotate that as well, to take account of the stick mount rotation.

Don’t worry, it’s easy 🙂

icade sanwa stickicade PCB mod
icade PCBicade octagonal gate sanwa

Unclip the existing square gate from the stick (again, note that this gate can be rotated forty-five degrees into a 4-way stick if you prefer). The PCB and four switches are all one piece and can be lifted off together, rotated ninety degrees and replaced. Then attach the octagonal gate (or your original if you’re happy with that) and you’re done.

Position the stick so the PCB faces up towards the back of the case, making sure the mounting ring sits properly in the widened hole, then attach it with the four screws that held the original stick.

Nearly there! All that’s left is to connect the directional wires to the 5-wire bundle. It’s best not to clip it on just yet, so that you don’t risk pulling on wires while making the joins.

Because we rotated the connector and the switches, we need to re-map the directions and as luck would have it there’s a brilliant guide to doing just that available here, which for ease of reading I’ve reproduced below with full credit to the original creator, rtdzign.

icade wiring guide rtdzign

The guide shows the view of the stick from beneath. With our PCB in the top position we want the bottom left picture. I have a Sanwa stick so on the 5-wire bundle I need to connect yellow to the UP wire, green to DOWN, red to LEFT, orange to RIGHT and black to ground.

You’ll have noticed there’s 4 black ground wires coming from the circuit board. As the stick uses a common ground you only need to use one of those four, doesn’t matter which; you should tape up the ends of the others so there’s no chance of metal contact in the future. I’ve read of people merging all four into one and connecting that, but I preferred the simpler way.

I used a screw terminal but if you fancy a spot of soldering then you might like this soldering guide on the Touch Arcade forums.

So, got your wires all connected up? Time to clip them onto the PCB and then fire it all up and make sure it works.

icade pcb helpicade sanwa

And assuming it does, you’re done! I got it right first time, thankyouverymuch 🙂

icade sanwa mod

Grab a cable tie and tidy up that bundle of joystick wires, then tuck everything in neatly, make sure nothing’s trapped and start screwing the case back up, casually tossing into the bin any Torx Security screws you may have encountered along the way…

icade sanwa stick

I have to tell you, the difference is huge. It was well worth the effort. Games like Pac Man, Silverfish HD, Hard Lines and Forget-Me-Not are so much more pleasurable due to the improved accuracy of the U/D/L/R directions with the octagonal gate; your high scores will improve, guaranteed.

icade sanwa buttons

The buttons are a different world. A feather-light press is all that’s needed and when hammered they make nothing like the cacophany the stock buttons do, plus you don’t feel like you’ve been for a workout. In something like Super Crate Box where reaction speed is key (thanks to the crazy big collision box around your character), the hair-like trigger on them is superb.

If you’re on the fence about trying this but fear of cracking the iCade open is holding you back, rest assured if I can do it, you can*.

Thanks for reading, and good luck!

icade mod sanwa stick buttons

* By the way please don’t hold me to that. It really is simple but if you’re disasterously bad at stuff like this and you go ahead and try it and screw it up by doing something stupid like cutting all the wires at the wrong ends or something, all bets are off and I will deny any legal responsibility to my claim that “if I can do it, you can”.

But seriously, you probably can.

UPDATE: a fellow iCade modder called Tom got in touch in the comments:

It was all going so well, up until it came time to attach the new joystick. The 4 original screws do not fit the new joystick, the holes are just slightly too large. I did purchase the same joystick, so I’m not sure what happened.

At first we thought this may be because some iCades appear to have been built slightly differently – the Torx screws don’t show up on every iCade, for example – but he got back in touch shortly afterwards by email to explain the solution:

It turns out that the screw holes on the joystick (both of them) are not threaded, they are just smooth holes. If you take the joystick apart, there are some hex nuts behind those smooth holes and that’s what the screws go into that secure it to the panel. It’s impossible to see this without taking the joystick apart. You may have mentioned this in your page, but I don’t recall seeing it. On the original joystick the nuts are glued inside the holes, so it takes a bit of work to get them out, but once you do, they fit into the new joystick no problem. Problem solved!

There were 2 nuts in each socket, so eight nuts total. I used a small socket and a hammer to get them out. Make sure the socket is big enough to not go into the threads.

I had the security torx screws too and managed to get them out with a very small straight slot screwdriver. There’s way you can leverage that nipple to actually unscrew it without having the tool, but again, you have to have a really small screwdriver.

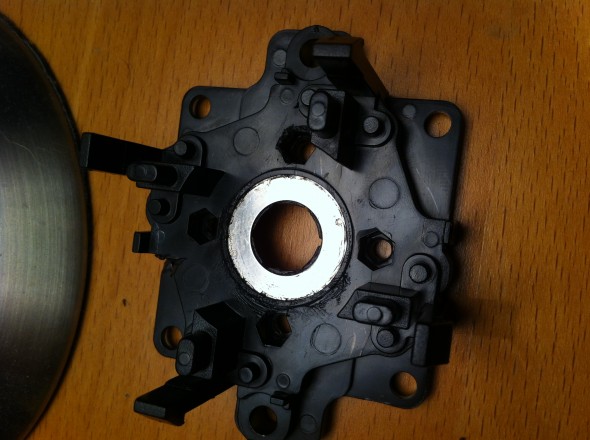
He also included the following photo, adding:

You can see where the hex nuts would go quite easily in this pic. This is the old controller, inside view.

icade-joystick-mod

So if you’re having similar problems, hopefully this will help. Thanks, Tom!

Categories
ExcludeTop7 iOS & Mac how-tos

Adventures in Apple TV streaming: switching from XBMC to Firecore’s ATV Flash

I’ve got an AppleTV 2. I like bouncing video from my iPad 1 to the telly via AirPlay but other than that it’s largely useless because I don’t buy video from iTunes and I don’t convert the video I do own to the format that iTunes and all dependant Apple devices recognise, because life’s too short. Instead, I jailbroke the box when I got it and installed XBMC. This worked really well until I upgraded to Lion which broke streaming due to Apple changing how Lion handled SMB sharing.

After much hair-pulling and XBMC-forum-surfing I found workarounds and posted about them (here and here). I stuck with using Playback to get my media available on the network, but I missed the lack of cover-art and metadata (which Playback doesn’t support). And then eventually my XBMC install became quite unusable after something, somewhere, stopped it from reliably connecting to anything at all. After all the jiggery pokery trying to get streaming working again I had no idea what I’d done and I gave up.

I switched back to streaming to my Xbox 360 via Playback even though: the 360 sounds like a jet engine taking off; it drinks electricity like water on a hot day; and it doesn’t show metadata or cover-art (whether you’re using Playback or not). It just streams the video, but that’s all I wanted at this point.

Enough!

Yesterday I had the house to myself and I decided to start over.

According to the AppleTV menus I was running OS 4.1.1, a comparatively archaic version. You may have noticed that for some reason Apple’s naming conventions for their iDevice versions of iOS and their ATV versions of iOS do not match, although for a brief time around iOS 4.3 they came in sync. I found a great post on Firecore’s forum that explained it. The current version of that post is reproduced below for ease of reference:

Firecore forum post explaining iOS naming conventions for ATV2 vs iDevices

It turns out that the ATV2 OS version 4.3 is the most recent version that supports untethered jail breaking, and that version also adds Airplay support for many 3rd party apps, not just Apple’s (try it with AirVideo from your iPad – just awesome). There is currently a tethered jailbreak for 4.4 (which is the equivalent of iOS 5.0.1 for iDevices) but trust me, you’d be better sticking to untethered if you value a quiet life.

UPDATE: When I performed the jailbreak only the 4.3 version supported untethered, but the latest Seas0npass includes an untethered jailbreak for 4.4. The major differences are AirPlay Mirroring from the iPad 2 but seeing as I only have an iPad 1 I am sticking with my 4.3 jailbreak for now.

I downloaded Seas0nPass from Firecore’s website, performed the jailbreak to 4.3 and all went well. I reinstalled XBMC Version 11 (Eden) which adds greater stability and also a new, easy-to-do streaming solution called AFP that supposedly works well with Lion. Well, it didn’t work out for me.

Although XBMC showed me an AFP connection to my networked computers, and although I’d turned AFP on and set up the folders I wanted to share, XBMC wasn’t seeing any shares. I appreciate it’s a work in progress and that maybe I missed something, but after trying all the other usual methods and coming up with a whole bunch of not-much just like last time (some folders shared, others didn’t, don’t know why, can’t be bothered to work it out any more), I decided that XBMC is still far too flakey to get stressed over and started looking at Firecore’s ATV Flash solution.

(For clarity – my Playback shares still worked but it doesn’t send any metadata like cover-art and that’s the main reason I like XBMC; ATV Flash does use metadata, so it won my favour.)

It’s a $30 bit of software that gets installed onto the ATV at the click of a button (unlike XBMC which requires installing either it or NitoTV via the Terminal, which can be a bit fiddly). The main difference between it and XBMC is that ATV Flash sets up shop in the AppleTV’s existing dashboard, maintaining the Apple-y feel; interactions all use the existing Apple UI. It’s pretty cool.

I’d had a look at ATV Flash before, when it was in beta, and had been suspicious of paying for software that does something that XBMC does with greater customisability for free. However, I was at the end of my tether with the implications of ‘free’ for now, and Firecore promised that setting up shared media would be as simple as making sure File Sharing was turned on in my Mac’s settings.

It worked seamlessly.

I appreciate there are people complaining in their forums that it doesn’t do this, doesn’t do that, glitches with streaming, etc, but the same is true throughout computing – some people’s setups will play nice and others won’t. My experience so far has been flawless, touch wood. We streamed a movie over wifi from my iMac to the ATV and it was smooth and uninterrupted (the movie itself, Insidious, was fun but kinda stoopid). It has a couple of areas I’d like to see improved, such as the ability to scrape for movie metadata based on a folder name rather than a media-file (because all my movies reside in their own named folder within a Movies folder) but apparently features like that are coming, and updates do seem to be quite regular.

So: it didn’t crash, it was ridiculously easy to add my computer’s shared folders, and it all feels like it’s part of the same Apple experience.

You do have to buy before you try, but they have a 15-day money back guarantee. I can’t tell you how well that works because I won’t be needing it. For $30, I’ve hopefully found my final ATV2 streaming solution.

Thanks for reading. If you’d like to comment on anything I’m @myglasseye on Twitter.

Categories
How-Tos iOS & Mac how-tos

How to replace new Instagram with an older version

UPDATE 3: September 3rd, 2015 – well, two years later and out of nowhere this post is suddenly tremendously popular again for some reason! Has Instagram been updated again? Does everyone hate it for some reason? What I’ve learned is: get over it. They won’t change it back, you probably can’t roll back any more (see below for how most of the old methods don’t work), and you’ll probably forget you were even upset about it after you’ve posted a few more pics of your lunch or your cat 🙂

UPDATE 2: September 30th, 2013 – as noted by Sergio Alejandro in the comments this downgrading trick, which used to work, doesn’t seem to work any more as Instagram are actively preventing their users from using older versions of the app, probably for compatibility reasons:

“This no longer works. I logging in after downgrading and it told me that the version I was using was an outdated version of IG, and that I’ve have to upgrade in the app store.”

Personally, I don’t really see the need to downgrade anyway. I originally wrote this way back when Instagram released version 2.0 and completely ruined all the filters. As far as I can tell (I hardly ever use Instagram these days so correct me if I’m wrong!) the iOS 7 update is just a cosmetic change and Instagram still works the same, it just looks different.

If that’s so, my advice is relax! Stop wasting energy hating something that doesn’t really matter – you’ll get over it – and spend that energy making nice photos to share instead!

UPDATE 1: September 27th, 2013 – I’m seeing a lot of visitors to this post now that Instagram has updated for iOS 7 – hello everyone!. The techniques used to roll back Instagram versions described in this post and in the comments below refer to much older versions. The principles should still be the same but I can’t guarantee it’ll work any more – good luck!


ORIGINAL POST: I recently wrote about the Instagram 2.0 update (over here), which added lots of headline features but at the expense of the lifeblood of the app; it’s filters. They seem to have changed the entire processing method and now all the filters seem like subtle variations of one another, with none of the character that made them so distinctive.

I mentioned in passing that I’d removed my copy of Instagram 2.0 as it was so awful and replaced it the earlier version from my iTunes. I’ve noticed a lot of visitors coming to the article via a Google search for that exact process so I thought I’d make it a little easier to find.

How to do it

You need to have the old version of Instagram.ipa on your computer already. This might be a problem if you downloaded the updated app via iTunes on your computer, or you downloaded the update on your phone and have since synced with your computer. Look through your iTunes media folder and if it’s not there, try the trash.

Once you have the old version of Instagram.ipa, place it in the correct folder in your iTunes hierarchy, along with all your other apps. Then delete the current, updated version of the app from your iPhone right now. Don’t worry, you won’t lose anything except your Instagram login settings which you enter when you re-install the app. All your photos are on their server and in your Photos app.

Now connect your iPhone to your computer and sync over that old version of Instagram.

Once complete should have the previous version of Instagram – or at least the version that was on your phone last time you synced with iTunes. Happy old-school Instagramming!

Back up

At this point we want to future-proof ourselves. Head to your iTunes Media folder, find the Apps folder and locate Instagram. It will be called something like ‘Instagram x.x.x.ipa’ (where x.x.x is the version number). Create a folder on your Desktop (or anywhere you like) called App Backups (or anything you like), then hold down the Alt key and drag the Instagram app into that folder. You should see a green + sign to indicate you’re copying the app, not moving it.

The idea is that if you now accidentally overwrite the original app in your iTunes folder you can replace it with your backed-up copy and re-sync.

UPDATE

Melissa posts in the comments that it even if you updated in iTunes or already synced, all may not be lost:

It’s also possible to roll back to version 1 even if you *have* updated the app in your library…

On a Mac at least. iTunes will throw the old version into your Trash folder. Just retrieve it from that folder (I just copied it to my Documents folder), delete the new Instagram from iTunes, and drag and drop the old version into iTunes to add to your library. Then sync! Works a treat 🙂

That’s going to be very good news for some of you, I reckon!

Categories
ExcludeTop7 How-Tos iOS & Mac how-tos

Another way to stream to XBMC on an ATV2 from a Lion Mac

A couple of days ago I wrote about how to set up your Lion Mac to stream media to XBMC on your jailbroken AppleTV 2, since Lion changed the way SMB worked and hence broke SMB streaming. It involved a great wee application called Playback, which streams to a whole bunch of devices including XBMC installations. It avoids having to get your hands dirty in Terminal, but requires a £10 license (a small and well-deserved price to pay).

I’ve had an eye on the usual forums and spotted another method of doing the same thing which also has the advantage of being free and of being able to take advantage of your meticulously organised fanart, posters and .nfo files, something I don’t think Playback does (if it does, please let me know how in the comments).

This alternative uses WebDAV and an application called MediaMaster Server, which is free on the Mac App Store – and seeing as this post is really just for Lion users, that shouldn’t be any barrier to entry. I believe the app is actually meant as a free complement to a paid iPad app for streaming media to your iPad, but it also happens to work nicely with XBMC.

Here’s how you set it up:

1) Download the application and launch it.

2) Click ‘Select root directory’ and navigate to the folder that contains your various media folders. For example, all my various types of media have their own folders, and all of those reside in my ‘Media’ folder on my external drive. That is the folder I’ve used as my root directory.

3) In the settings tab, give yourself a username and password, and click on ‘Secure HTTP’ if you want a secure setup. I left the port as the default.

4) Click the master switch on the left to ON.

5) In XBMC go to setup a new share and navigate to the option that lets you fill in WebDAV (HTTPS) settings.

6) The network address is the local IP address of the computer that’s running MediaMaster Server – for example, 192.168.1.60 (don’t copy that, it’s just an example! Find your own IP address in the Mac’s System Preferences under Network)

7) The port, username and password is whatever you selected in step 3

8) With these details filled in, save it as a source and select it for use. It should detect the various folders within your shared root directory and ask which one you want to use. From here on just set up your folders as unique sources such as TV, Movies, etc.

One thing I’ve noticed with my setup, and it may well be to do with me having a recent nightly build of XBMC as opposed to the approved version, is that scraping is painfully slow. It only needs to do it once, of course, but if it’s taking it’s sweet time you could wait until bedtime before setting it running and in the meantime just access your files through the Videos>Files route in XBMC.

So if you’re having Lion/SMB/XBMC/ATV2 woes you now have two options for getting your media centre up and running again! Good luck and thanks for reading. If you’d like to comment on anything I’m @myglasseye on Twitter.