There’s dozens of retro processing apps in the App Store, but Hipstamatic has captured the ol’ zeitgeist and it’s great that so many people are interested in it because it’s a cool wee photo app. I love it – to the extent that I created a huge matrix of all the lens/film combinations possible at the time – there’s more available now as in-app purchases.
I thought I’d share a bunch more apps that I think you’re definitely going to be interested in if you’re a Hipsta-fan, and also because I think they deserve more attention because someone’s been hogging it all! Some have wonderfully detailed and engaging user interface designs. Others, not so much. But they all have three things in common: they’re cheap, they’re fun and they make great photos.
I wrote about it here. I think this is easily one of the best photo apps currently available and a superb companion app to Hipstamatic. It has a beautiful UI and a highly flexible array of effects and sharing options.
You add one effect each from frames, light leaks, noise and vignettes, can further manipulate RGB, contrast and brightness and share with all the major social networks. Some of the effects are quite heavy so you can overdo it easily, but used with restraint PictureShow images can be extremely pleasing.
I’ve not written about this one in length before but it’s a beauty. Created by the developers of Hipstamatic itself, it uses the metaphor of a dark room with a range of different processing chemicals stored in bottles on a shelf, and allows you to create custom effects by adding measures of chemicals to a developing tray. By adding chemicals in different combinations you create unique effects and you can save your favourite effect combinations, or recipes, to use again.
I love the effort that’s gone into the interface, and it can be a very creative processing experience. The only downsides are the unskippable animations and lengthy processing times, which make regular use a bit frustrating if you’re used to the quick presets of other apps and I found my use of it waning. Even so, you should definitely add it to your collection at that price, especially if you don’t mind taking a more leisurely approach to processing an iPhone photo.
Instagram probably doesn’t need much introduction to some of you, but if you’re remotely into Hipsta you’ll love this (it’s my app of choice at the moment) and at the awesome price of FREE you should get it now.
With Instagram the focus is on speed and simplicity. You take a photo in the app or load one in and it’s cropped square before you get to choose from over a dozen retro effects, each with it’s own border. You name it, add a location if you like, then upload to a variety of the usual suspects – you can send to multiple sites all at the same time.
It also automatically uploads to Instagram’s own site, as there’s a whole other social networking focus to the app. Outside of the processing element you can follow other users and rate their images which can eventually become Popular, exhibited on a dedicated feed. It’s rather like Twitter for photos, but it’s wholly ignorable if that’s not your thing. If it’s very much your thing, look out for photos from ‘myglasseye’.
Camera+ is sort of the odd one out here in that it isn’t that pretty, and it’s the only one that isn’t primarily an effects app, but is pitched as a replacement for the official Camera app. It’s packed with functions designed to make taking photos easier, including grids, stabilisation, a timer, burst mode and separate focus and exposure touch controls. The only thing that really stops me using it over the official app is that all photos are saved to it’s own reel, and there’s no way of preferring them saved to the iPhone reel. You have to go in there, select the ones you want to keep and then save them out.
However, it also comes with a bunch of effects, many of which are retro-inspired. I’d say the signal to noise ratio in the selection isn’t too favourable but as an overall camera package it’s a good one to have alongside your full-on retro apps.
I believe you can get all these for not much over a fiver, so I think if you’re remotely entertained by Hipstamatic you’d be mad not to!
The iPhone photo app market is saturated with apps to replicate the retro look. It’s probably a fad that should be on it’s last legs, but the apps keep coming and truth be told I do still like the look when it suits the image so purists be damned!
For the last few months I’ve almost exclusively been turning to the fantastic Hipstamatic to tart up my iPhone photos and wrote a wee appraisal of it a few months ago. Since then the creators have released a second photo app called Swankolab which I played with for a few days and was going to write about. I ended up not bothering in the end as I didn’t really enjoy using it.
Briefly, Swankolab has a very attractive interface designed around a darkroom, with you combining squirts of developing fluid into a tray that your chosen photo is ‘dipped’ in to create unique effects, and the whole process unfolds with amusing animation of the chemicals pouring into the tray and the print sloshing around as it develops.
For me, immediacy is key with iPhone photo tweaking. Where Hipstamatic is pretty snappy, I found Swankolab fussy, and the processing itself very sluggish on my 3G (when I upgraded to the iPhone 4 the first app I tested was Swankolab and it was a little faster but not much). The animations and lengthy processing began to grate, I could never really remember what effect each ‘chemical’ had and the sheer depth of combinations ended up being daunting rather than inspirational.
It’s a beautiful app and potentially a lot of fun so long as you have a bit of patience. Sadly I didn’t – however, all of this sets up what I like about graf’s PictureShow (App Store link)
PictureShow has had a recent update to version 2. I never tried the original, but I found some references to it online and this update appears to have been quite the bumper pack of new features.
The presentation feels very much inspired by Hipstamatic, the icon and interface sharing a love for old school camera design. Processed prints slide onto the screen Polaroid-style over a classy black leathery background bearing the logo. It applies effects to both photo library images as well as those taken in-app (although there is no stylised viewfinder a la Hipstamatic) and almost all the effects are of the ‘toy camera’ ilk, featuring colour filters and Holga- and Lomo-alikes as well as some that play with cropping and faked multiple exposures (although these aren’t particularly good, more on this later).
The options available include 24 basic image filters, 20 frame styles, the ability to add text in a number of fonts and sizes, a range of light leak and grunge effects which add considerable character to your images, and individual red, green, blue, brightness and contrast controls that allow you to tweak the filter presets. There’s also an option to add either the date or your name to certain frames in addition to the text option (the date used is the date you processed the image in the app, not the date you originally snapped the source photo).
Here’s a look at those basic filters in a handy table:
Some really nice looks in there, but as you can see the last few filters are a bit weird, especially the quad styles as it’s a bit of a bodge. Rather than taking 4 images in succession to use, it takes your single shot and uses it four times, cropped and zoomed automatically. I think these filters are a nod to the likes of the SuperSampler plastic Lomo cameras, but if you’re after this sort of thing on your iPhone get QuadCamera, which is superb. Similarly the Multiple Exposure filters take your single shot and chop it up, flip it around and superimpose it on top of itself. It can be effective, but it’s a shame you can’t superimpose a selection of your own images.
But of course that’s not all. You can apply one of the 20 available frames to your filtered photo (or leave it naked):
Added to that are a range of ‘light leak’ and noise/grunge effects – life’s a little too short to make a table of all of those as well, but you’re sure to find something you like in there and as with the other features you don’t have to use them at all if you don’t want.
It’s easy to get exactly what you want without having to experiment too much with combinations. Preview images load quickly so you can flip through them manually, or pull down a handy list (that carries a thumbnail example of each) to jump straight to the one you want. There’s also a Shuffle button that quickly delivers a random combination for you to save or discard before hitting it again for another offering.
Here’s a selection of images produced by the random generator that I liked, including some light leak and noise effects:
Output and sharing options are generous, with options to send to Twitter, Facebook, Flickr and Blogger, your email or camera roll, and offering a range of image dimensions to suit all models of iPhone. An image processed at full res (2048 pixels tall, only available on the 3GS or newer) took about 8 or 9 seconds to save to my photo library. The next res down (1600 pixels tall and perfectly useable), took about 5 or 6 seconds, and lower than that (400, 600 and 800 pixels tall) you start to get into the realm of email and web-friendly resolutions that lack the detail you’ll want for your keepers.
I still think Hipstamatic has the edge in some aspects. For example, whereas two consecutive photos taken with Hipstamatic’s films and lenses will rarely have exactly the same vignette effects, in PictureShow most of the grunge and light effects appear the same from photo to photo, occasionally being rotated. This is most noticeable using coloured light leak effects when a B&W filter is used, as the leaking colour isn’t muted by the filter.
Another niggle is the inability to switch off the weaker filters when generating random effects. I’m thinking particularly of the ‘quadrant’ and mirror filters and the film sprocket frames, which I will never use. This is something that other apps such as CameraBag and ToyCamera allow and it would be a very welcome addition. The buttons at the bottom of the screen for switching between the editable parameters are a little fiddly to select, and placing any text precisely can be a pain as it appears directly under your fingertip, obscuring the exact placement. Finally, it could really do with updated visuals for the iPhone 4 screen as at the moment everything is a little pixellated, including the image you’re editing – although the images saved to the photo library look great. Pictureshow is now Retina-friendly!
Overall, the proof is in how much you use the app and how pleasing the results are and on that score PictureShow is a winner as I’ve been using it a lot. Packed with a good range of filters and effects, output and sharing options, as well as an appealing and fun attention to detail in the design, I heartily recommend it.
(UPDATE: if you’re reading this you might be interested in a Photoshop action I wrote to sort of emulate the look of these retro camera styles – have a read of ‘my Hipstamatic effect for Photoshop’ after you’re done here. Okay, as you were!)
I recently went off iPhone photography for a while. I’d set myself the goal of uploading a new iPhone photo every single day to my Tumblr blog and within a few months it became a kind of millstone around my neck and so I went off iPhone photography for a bit, had a clean-up of apps I never use and cleared out the thousands of photos in the filmroll which was slowing the camera dooown.
A few weeks later I’m sort of getting the itch again. Just a tingling really, nothing to see the doctor about. Well, I had a little look in the photography section of the App Store the other day, not to buy anything you understand, just to see if there was anything new and exciting to play with and clicked on Hipstamatic (App Store link) almost by chance really. There’s quite a lot of Lomo and Holga style apps already, and I felt like I had got one of the best in ToyCamera. Hipstamatic’s icon isn’t flashy, but the name is catchy and it had a great rating, so I gave it a go and I love it.
It’s so fun to play with and use. The way it works is that you have the basic Hipstamatic ‘body’ and you select a combination of one lens and one film, then optionally charge up one of four ‘flashes’. The display has two ‘sides’, the front and back of the imaginary Hipstamatic camera, styled after the Instamatic range of cameras. Along the bottom of the front display are buttons allowing you to change the film, flash or lens, buy new packs from the shop or flip to the back screen. Alternatively you can swipe the lens to swap in the next available lens. On the back is a small squarish live viewfinder, the flash charger and the huge yellow shutter release button, and if you shake the phone you get a completely random setup.
So you select your film, lens and optional flash, take the shot, then wait a few seconds while it ‘prints’ the shot and saves it into the iPhone camera roll as well as the app’s own gallery. Tapping the gallery button takes you into a gorgeous gallery display where you slide through your recent prints. Tapping one flips it over to reveal the lens, film and flash settings. From here you can copy the settings for your next shot, share it through Facebook, Twitter or email, bin it or enter it into one of the regular contests the developers run.
A full kit comprises 8 films, 6 lenses and 4 flashes but the app comes with only 3 lenses (John S, Jimmy, and Kaimal Mark II), two flashes (Standard and Dreampop), and two films (Ina’s 1969, and Kodot Verichrome) as standard and further expansions cost 59p per ‘Hipstapack’. Each pack usually contains at least one lens and film, and occasionally an extra flash and purchasing them takes you into a custom-built store with it’s own gorgeous graphics. I really love all this attention to detail.
So it’s a pretty slick app!
The fact that you can combine any film with any lens means that theoretically you’ve got 48 different looks available, plus even more variations on those by using one of the different flashes which basically just apply a splash or wash of colour or ‘light’ depending on what you use. In practice, however, a few of the different looks are all but identical apart from the frame applied. On the other hand, something I really liked is that while other apps often have a set vignette effect that doesn’t change much if at all from shot to shot, Hipstamatic appears to have quite a variety available meaning it’s rare to get exactly the same vignette effect on two consecutive shots using the same settings. That’s a nice touch and really adds to the realism of the effect.
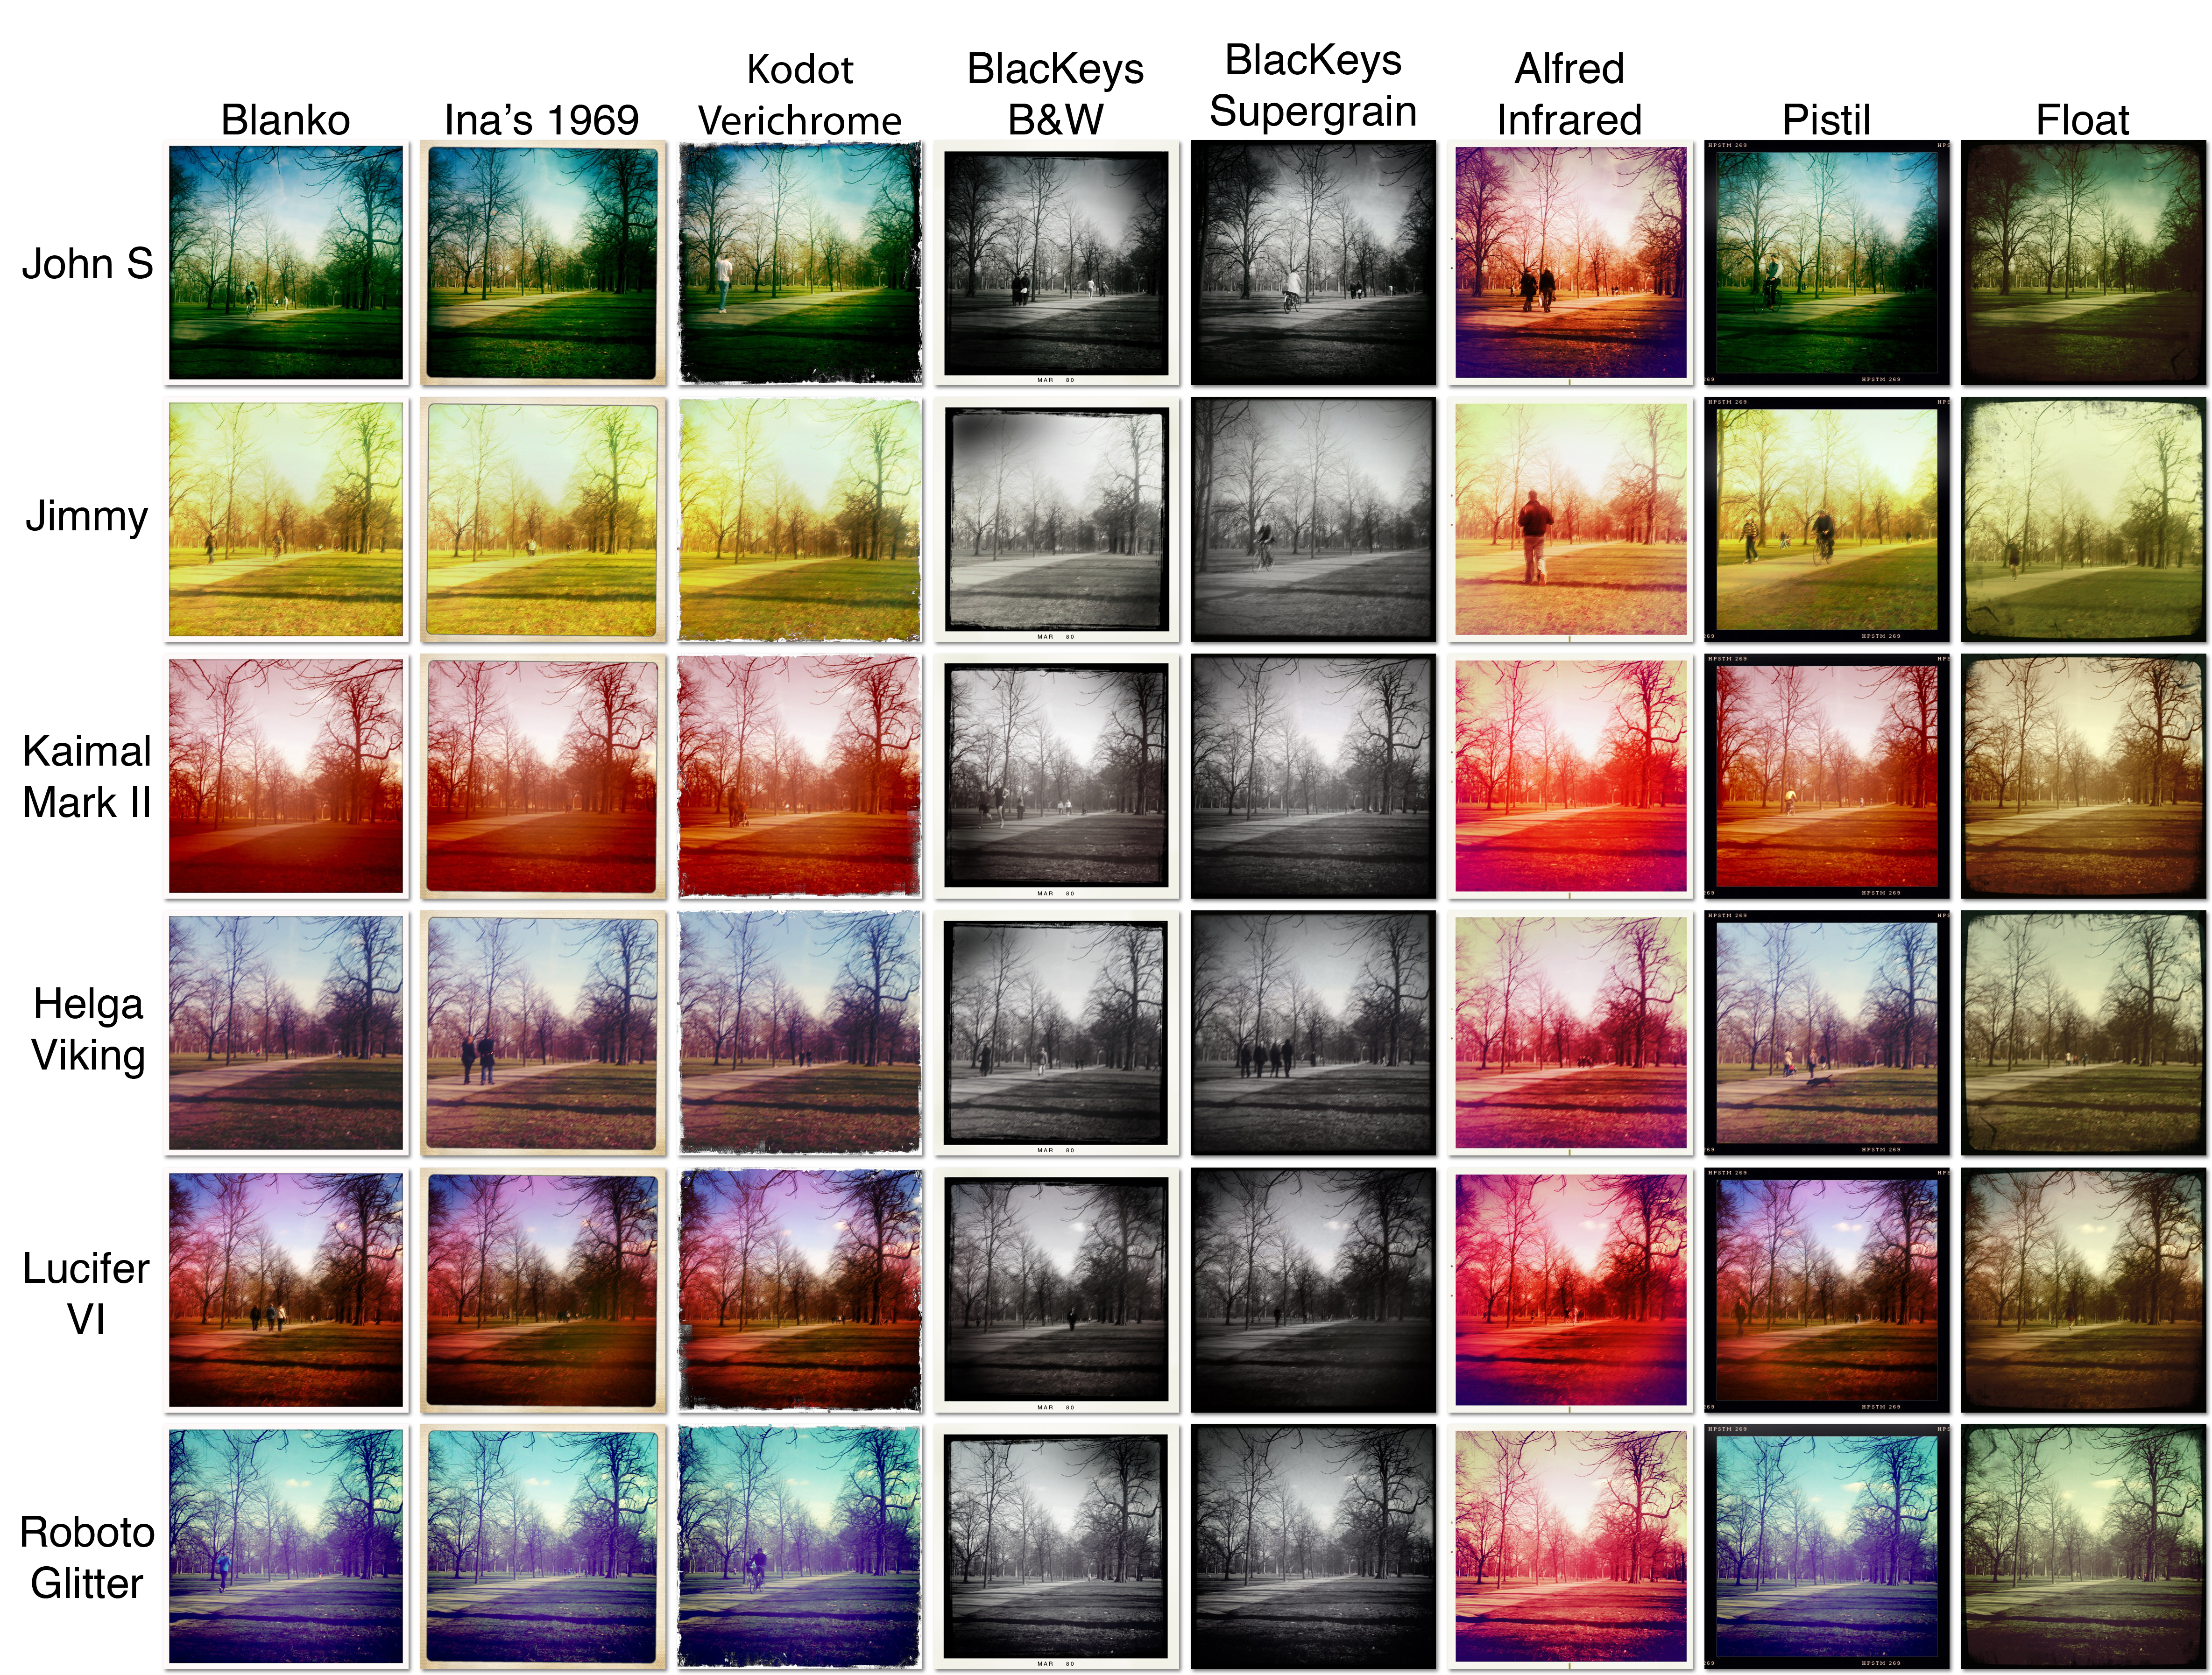
In the name of testing these effects, I spent 20 minutes crouched in Hyde Park trying each and every combination on the same scene. You better appreciate this:
Rows are the lens effects, columns are the film effects
If you’d like to see it in much greater detail, the original is available to download from Flickr here – a 12MB download but each image is original resolution.
As you can see, the first three films are identical except for frame, and I hope you can see what I mean about the slightly naff Kodot frame! B&Ws are also pretty similar, and although the blurb for the first BlacKeys film says it prints the date on, the only date I’ve ever seen is MAR 80 so I’m not too sure what’s happening there. Nice frames though, and my favourite film of all of them is the last one, Float. I love the smudgy contrasty vignette and artifacts it produces.
In terms of the lenses themselves there’s a good selection of looks no matter your taste, although John S is the one I find myself going back to most often. Don’t forget to experiment with all the films though. For example, the severe yellow look of Jimmy doesn’t do much for me until it’s paired with the Float film and you get a nice slightly faded off-green look. On the other hand, Kaimal turns everything a bit too red, and again the Float film saves the day, pulling it all back a bit.
It’s almost churlish to moan about something with such variety and charm, but… as I touched on above the two films that come with the basic pack and a third from the premium packs are exactly the same in terms of colour processing with the only difference being the frame they apply. The premium of these, Kodot, has a really fake looking scrappy frame which I think is the poorest of all 8 films. While I’m being picky, the two B&W films also seem pretty similar except for the frame despite implying in the name that one offers more contrast.
I only noticed when having a look close-up that several of the lenses (Jimmy, Helga and Lucifer) aim to recreate the imperfect toy-camera look by ghosting the image and you end up with what looks like camera shake on a long exposure. I’m not a fan of that as I’d rather they just slightly softened the image around the edges rather than make me look like I’ve got the shakes. It’s a shame as Helga and Lucifer in particular produce some lovely colouring.
I’m critiquing on a very personal level but hey, I’ve used a lot of Lomo-like camera apps and spent many an hour tinkering in Photoshop creating similar looks for own DSLR images so I knows what I likes. So I’ve got a couple of reservations, but I love this app as much for it’s fun interface and the huge variety of looks it produces as for getting me back into iPhone photography. This is well worth your cash, folks, and to give you a flavour of how it performs on scenes other than Hyde Park, here’s a few more shots I took the same day.
Who doesn’t love using cool stuff to make their day to day survival more pleasing and less hassle? I’m sure I’m not the only one who’ll trawl the interwebz looking for cool stuff to buy or install, in the name of streamlining or at least aesthetically enhancing my workflow or daily routine, or just because its… well, cool.
Here’s a list of cool stuff I use at the moment, none of which falls under any particular category. Consider it more of a Buffet of Cool. Fill your plate with as much or as little as you like and do feel free to pitch in with some of your own Discoveries of Cool.
So there’s now millions of iPhones in the wild and a lot of people are taking photos with them. According to stats that I checked just moments ago there’s over 14 million iPhone photos and over 113,000 iPhone 3GS photos on Flickr. I guess they don’t differentiate between the original iPhone and the 3G as the camera didn’t change, but the 3GS gets its own category since the sensor was upgraded. Interestingly I took a screengrab of the same statistics on Tuesday the 29th of September (almost a week ago) and there were 76,000 3GS images, so that’s a 50% increase in 6 days, which seems odd assuming Flickr’s stat machine isn’t on the blink.
Obviously there’s nothing new in taking photos on a phone and other phones have many millions of photos on Flickr, but my point is that the relatively poor technical spec of the iPhone camera doesn’t make it any less popular amongst its users.
The wealth of photography apps on the Store offer a huge variety of options to the experience of taking a photo. There’s a lot of repetition though, and plenty of trash, so I’ve only ever gone for apps that were either considered the best or which appealed in some other way, such as the interface. Whatever you can think of, by this point there is almost certainly “an app for that” (grr). I’ve just had a clear-out and the core bunch that will never leave are CameraBag, QuadCamera, ToyCamera and Tiltshift Generator. I’ll look at those four today, and they’re really fantastic if you’ve not heard of them.
Three others I use a lot, not covered in this post but perhaps later, are Pano, Polarize and Snapbox. Pano and Polarize are another two keepers and I heard that the latter is about to get a big update which will hopefully fix some long-standing issues with the once-dormant app. Snapbox is one I toy with now and again but is by the same developer as Polarise so worth a mention alongside it.
I also hang on to Photogene and Best Camera. I find these apps perfectly adequate but if it wasn’t for a couple of particularly cool or useful things they did I wouldn’t miss them if I deleted them. Still, worth a look!
Finally I also have a couple of photo-related apps, Tumblr and Pixelpipe, that don’t actually process shots but are my go-to guys for uploading to blogs or Flickr, as well as another app called DropBox that I’ve been using a lot of recently for syncing iPhone photos (amongst other things) across my devices.
So I’m going to go through each one and give it a mini-review with as many screenshots as possible to let you make an informed decision about going on an App Store spending spree.
I think this was possibly the first camera app I got on my iPhone, and it’s still easily my most used, I absolutely love it. It has 10 filters built in although two of them are a bit crap really, as you’ll see below. You load a photo by selecting it from your library or taking a new one within the app, then choose a filter to apply by swiping left or right through them. It shows you the effect and when you’re happy you save the image. There’s also a drop down menu for going directly to a filter.
Guess which two filters I’ve removed from the ‘swipe’ list? Yep, Infrared and Fisheye. Still, valiant attempt to diversify but I think they’re a bit naff. The 1964 option is a little harsh as well, creating blown highlights and huge areas of pure black, but it’s worth keeping active as it does suit some photos.
Also, I’ve disabled the ‘crop’ feature in the settings, but when it’s active it crops the Helga, Lomo and Instant filters square, crops 1974 almost square, and Cinema into a narrow 16:9 format which really doesn’t work well on vertical images. There’s also a border option and you can vary the output size of the saved images if your iPhone is struggling – like most camera apps it gobbles up memory and so like most camera apps has garnered its fair share of negative reviews on the App Store for regularly crashing if it’s been a while since you last rebooted the phone. If that happens restarting is generally necessary but the I’d have thought the iPhone 3GS would run it well – can anyone confirm that?
If you’re feeling especially creative you can reopen a saved image in order to apply another filter on top. This mechanic of multiple filters has since been done better in a few other apps which allow them to be applied on top of each other before saving, but like a classic movie this app never seems to get old and every so often an update drops a new filter in there. There’s even a desktop version now, although the Photoshopper in me is loathe to stoop to an automated processing technique for ‘proper’ photos.
This is just one of several photography apps from Takayuki Fukatsu, who runs a company called Art&Mobile. Apparently his photo apps are regularly amongst the most downloaded iPhone apps in Japan, particularly ToyCamera which I’ll come to next.
QuadCamera basically copies the likes of the Lomo Actionsampler and Oktomat cameras, which take 4 or 8 shots in quick succession and present them in one frame as a sequence. A quick look at the settings page clearly shows the options available, and also gives you a good idea of the presentation style Art&Mobile favour. As you can see it’s very un-Mac-like, which at first alienated me but it actually does the job very well and I’ve come to rather like its distinctive appearance, which also appears in his most recent app Tiltshift Generator, although not in ToyCamera.
In terms of customisation there’s a slider to alter the delay between each shot in your sequence, whether to shoot 4 or 8 shots and whether to lay them out in a row or in a 2×2 or 2×4 arrangement. There’s a selection of filters: Vivid, Bright, Dull, Hi Con, Grayscale and No Effect. If you choose the 1×4 or 1×8 options the app will lay them out vertically for landscape oriented shots, or horizontally for portrait orientation.
There’s a second menu hidden in the Settings app for the iPhone itself, where you can remove the borders or the vignette, or activate a ‘Tap Anywhere’ shutter release, and deactivate the shutter sound.
QuadCamera is unusual in that it automatically saves the result whether you like it or not. In my case this means I easily end up with a dozen different new photos in my camera roll every time I use it because once you start it’s hard to stop and even though I might not actually like any given result it gets saved regardless. It’s extremely hard not to find something interesting in pretty much every shot you get from it, though, especially with all the different filters to try.
There’s also a lot more you can try with it than just the obvious ‘train coming into a station’ type shot. I had dozens of attempts at the magazine shot below before getting it the way I wanted it! The escalator shot went through the Lolo filter in CameraBag a few times to get the glowing orange. It also makes for unusual panoramas.
There’s not a great deal else, if anything, that duplicates QuadCamera – if there is I’d like to have a look at it. If you don’t already have it, you should definitely check out this app and others from the same developer.
It’s another of Takayuki Fukatsu’s apps and I toyed (geddit?) with deleting it quite a few times as it was frustratingly restrictive when it came to customisation. A recent update fixed that though, and so it’s earned a permanent slot on my ‘camera app’ screen.
Vintage GreenVintage WarmVintage Yellow
Low SaturationHigh SaturationToning Sepia
Rich B&WHiCon B&WOriginal scene, no ToyCamera
ToyCamera is designed to mimic the weird colours, blur and vignetting of ‘toy cameras’ such as the plastic Holga and Lomo models. There’s plenty of other apps that offer similar effects as it’s a look that’s very much in vogue, and to that end purists should note that it’s heavily stylised, with extremely strong colour, contrast and B&W toning filters that go way beyond most photos I’ve seen produced by these cameras it’s inspired by. The flipside of this is that in terms of this look, ToyCamera is pretty much rules the roost on the App Store.
Up until recently the app used to apply the filters randomly by default, which was frustrating if the filter it chose didn’t suit the image (they really can be too much sometimes). Now, however, you can choose a specific filter to be used but only before you shoot; you can’t pick an effect to apply to a photo you already have, like you can with CameraBag for example. If you’re into the whole random ‘shoot from the hip’ ethos that the Lomographic people promote then you can activate the random mode and select which effects you’d like it to choose from.
Other settings include the standard image size settings (with a full range of sizes from 320 x 427 up to 1200 x 1600), the option to crop square and/or apply a vignette, and whether or not you’d like to upload to the Big Canvas Photoshare community. I’ve never used this as there’s just too many photo sharing communities out there for me to keep up with, but it’s there if you want it. Ideally a future update of the app would add Twitter and Facebook and all the usual suspects, which is actually something that several other apps could do with sorting out in the same vein as Best Camera has (the best example of a one-touch sharing solution – I’ll cover it in a subsequent post).
Apart from that it’s a fun little app that offers pretty much all the crazy extreme ‘toy camera’ effects you could possibly want.
Yet another photo app from Art&Mobile, designed by Takayuki Fumatsu and Takuma Mori. It’s an example of a function that is covered by other apps in the store (such as Tiltshift – App Store), but to my tastes this is the better example, with a more pleasing effect and the same sleek interface which I liked so much in Quadcamera.
Tiltshift lenses are expensive lenses that allow you to shift the focus around by tilting the lens independently of the camera body, creating bizarre depth of field effects that trick the eye into thinking it’s looking at a miniature model of a life-size scene. It’s possible to fake the effect by applying heavy blur to a photo, leaving a strip or area sharp. Tiltshift Generator gives you this ability, as well as the option to alter the contrast, brightness and saturation, and add a vignette.
Like many other apps, you have the option to shoot a photo from within, or open one from your library. Then you select the area you want to keep sharp (or protect for blurring). In the example above I’ve used the ‘strip’ option but you can also switch to a circular selection. As you can see, there’s a central pair of thick bars, then two lighter outer bars. Inside the thicker bars stays sharp, and between that and the outer bars the blur blends in. Moving the slider adjusts how ‘quickly’ the blend occurs across the photo.
The next tab along covers the saturation, brightness and contrast controls. Finally there’s a vignette slider, and then saving and export options. Export lets you mail it out or post to Twitter.
If there is any room for improvement with Tiltshift Generator, it’s that the contrast and brightness sliders are very sensitive and it’s very easy to make a small precise adjustment and then nudge it when you remove your finger from the screen. The iPhone sensor doesn’t have the greatest dynamic range in the world so it’s all too easy to blow the hell out of the highlights, or create large chunks of sold black in the corners with the vignette – but a little tweaking can usually find a good middle ground. Also, the save size is set to 800×600 but I believe this will change in a future update.
I’ve found you don’t need to limit yourself to making traditional tiltshift photos, and have used the app to blur the corners of photos in a ‘Holga’ style, as well as to create depth of field on my 3G iPhone.
I’m a big fan of vignettes and slightly de-saturated contrasty images, so this app has seen almost as much use as CameraBag since its release. Highly recommended!
That’s all for now but plenty to get your teeth into if you’ve not heard of any. Next time, Pano, Polarize and SnapBox.


 The wealth of photography apps on the Store offer a huge variety of options to the experience of taking a photo. There’s a lot of repetition though, and plenty of trash, so I’ve only ever gone for apps that were either considered the best or which appealed in some other way, such as the interface. Whatever you can think of, by this point there is almost certainly “an app for that” (grr). I’ve just had a clear-out and the core bunch that will never leave are CameraBag, QuadCamera, ToyCamera and Tiltshift Generator. I’ll look at those four today, and they’re really fantastic if you’ve not heard of them.


 Also, I’ve disabled the ‘crop’ feature in the settings, but when it’s active it crops the Helga, Lomo and Instant filters square, crops 1974 almost square, and Cinema into a narrow 16:9 format which really doesn’t work well on vertical images. There’s also a border option and you can vary the output size of the saved images if your iPhone is struggling – like most camera apps it gobbles up memory and so like most camera apps has garnered its fair share of negative reviews on the App Store for regularly crashing if it’s been a while since you last rebooted the phone. If that happens restarting is generally necessary but the I’d have thought the iPhone 3GS would run it well – can anyone confirm that?


 In terms of customisation there’s a slider to alter the delay between each shot in your sequence, whether to shoot 4 or 8 shots and whether to lay them out in a row or in a 2×2 or 2×4 arrangement. There’s a selection of filters: Vivid, Bright, Dull, Hi Con, Grayscale and No Effect. If you choose the 1×4 or 1×8 options the app will lay them out vertically for landscape oriented shots, or horizontally for portrait orientation.


 Up until recently the app used to apply the filters randomly by default, which was frustrating if the filter it chose didn’t suit the image (they really can be too much sometimes). Now, however, you can choose a specific filter to be used but only before you shoot; you can’t pick an effect to apply to a photo you already have, like you can with CameraBag for example. If you’re into the whole random ‘shoot from the hip’ ethos that the Lomographic people promote then you can activate the random mode and select which effects you’d like it to choose from.


