Categories
Editorial

Photography in Grand Theft Auto V

GTA V photos
Death in the leafy suburb of Rockford Hills

I absolutely love GTA V. After what I felt was an increasingly tedious, humourless attempt to draw some ‘maturity’ into the series in GTA IV (which I eventually got bored with and never finished, nor did I bother with any of the DLC), GTA V has captured my imagination entirely and I’ve spent about 60 hours to date in the game having an absolute blast both playing the story and just ‘living a life’ in the state of San Andreas, albeit a legally questionable one.

Something I’ve started messing around with recently, now all the Rockstar Social Club servers are finally working, is the Snapmatic photo app on the in-game mobile phone. Not only is there more than enough craziness in the scripted action to snap, the world Rockstar has created is so realistic that it’s perfectly possible to spend your entire time photographing the game’s inhabitants and their autonomic adventures – and misadventures.

What you snap comes down to what you feel like. Earlier this week I decided to take advantage of the fact it’s not real by creating works of ‘art’ from the act of ‘murder’ – I’d find a nicely framed, artistic-looking shot, populated by some non-playable city dwellers just going about their day (walking by, snapping their own phone photos, reading a paper, window-shopping, chatting on a corner, whatever), then I’d brutally slay them in the messiest way (usually a sawn-off shotgun) and snap the otherwise aesthetically appealing photo.

GTA V photography
A death on the steps of a Rockford Hills church.
gta v snapmatic
Dead busker outside the Oriental Movie Theatre

After a few shots this got a bit too easy so I started focussing on just the blood splatter, framing otherwise arty shots that were unmistakable adorned with the lifeless corpse and/or arterial spray of some poor unfortunate passerby. Dexter would love it.

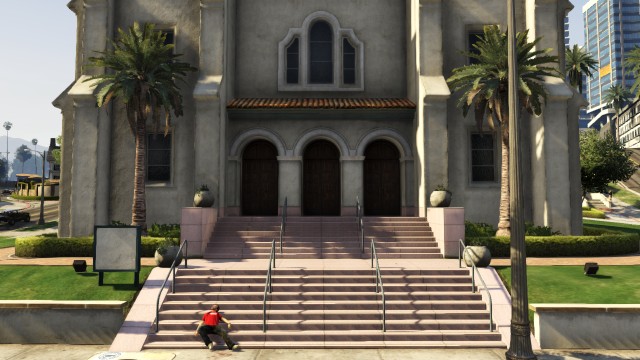
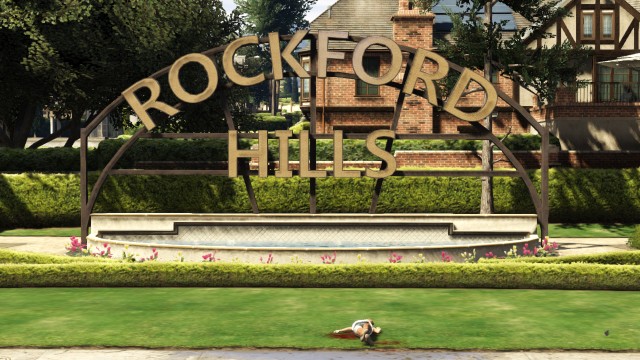
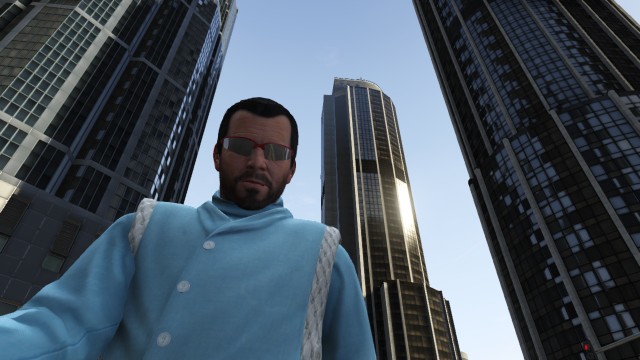
But it’s not just me. Check out the Snapmatic photo-sharing page on Rockstar Social Club and you’ll see tens of thousands of gamers taking photos ranging from obvious selfies to more artistic and amusing moments frozen forever in between committing multi-million dollar heists. Here’s a few of my own less gruesome snaps around the city:

GTA V snapmatic photos
An abandoned mine entrance in the side of a mountain – you’ll find a Letter Scrap here by the way.
snapmatic photos gta V
Michael snaps a selfie downtown. Kifflam!
gta V monkey mask
GTA meets Planet Of The Apes
gta V photography
Emergency indeed – a little too late for these unfortunate victims.

Whoops, how’d that last one get in there?

In short, having fun with the phone-camera in GTA V is most definitely A Thing That People Are Doing. Which brings me to…

Petapixel’s humourless commenters

Mashable highlighted Fernando Pereira Gomes, just one of the many hundreds of players who are really making the most of the Snapmatic app, a real-life street photographer who has turned his own visual style to the streets of Los Santos to very pleasing effect. I love the shots he’s found in the city, they’re great. They go a long way to demonstrating that this city has a life outside of the scripted events of the storyline. Like I say, this chap is far from the only one doing this, but he’s a good example.

Petapixel picked up the link from Mashable and ran their own story on it, which is where I came across it this morning. And then I got into the comments.

As a rule internet comments are a worthless cesspit of self-entitlement, arrogance and bigotry, with a good dash of deliberate trolling thrown in to stir it all up. True, there are those who may just want to add their opinion to a balanced discussion taking place, and that’s great. But I’d say the majority of internet commenters simply want to unleash double-barrels of snark, correcting opinions they consider wrong, and do so with the fervent belief that only their opinion matters and That’s The End Of That.

As it was with the comments under the Petapixel story which are loaded with “this isn’t photography!” and “there’s a name for this: copyright theft” (eh?), and “um, this is called making a screenshot and requires no skill” and “so can I take photos of other people’s creations in a museum and call it art?” and “he didn’t use a camera, therefore it’s not photography” and “photography is defined by exposing chemical film to light actually” and “so if I screenshot Zelda: A Link To The Past, does that make me an aerial photographer?” and so on, and so on.

Enough, you tiresome bores!

I’d like to say this to everyone posting guff like that:

Get over yourselves, and do something about your shoulder-mounted chip against anyone who dares to question your personal definition of what photography is. Seriously, what does it matter? Why not put all that energy into creating something of your own that meets your terribly narrow definitions rather than attempting to piss all over someone else’s fun?

Rockstar put a camera in the phone that the player uses in the game. Switching into the camera roots you to the spot and gives you a zoomable, panable, tiltable viewpoint with which to frame and take a photo, in-game, which is then shared on their real-life photo sharing website at the Rockstar Social Club.

Correct: no chemical film is exposed to light.

Correct: no physical device that looks like or could be described as an actual real-life camera is ever in the user’s real-life hands.

Correct: the world that is being ‘photographed’ is entirely artificial and coded from the ground up by Rockstar.

But so what? The world they constructed is so beautifully made that emergent activity outside the realms of the scripted action happens all the time, all over the map. Cops chase villains, crash their cars, and engage in gunfights with them. Thieves hold up ATM users. Tourists stop in the street to snap photos. Hawkers try to sell you stuff. Pedestrians compliment and abuse each other – and depending on what you’re wearing, driving or doing, you too. Bums stagger down alleys and collapse. Birds fly into helicopter rotors and emerge as a burst of blood, feathers and fleshy bits. Reckless drivers mow down careless jay-walkers, then are wrenched out of their car by outraged witnesses and beaten to death. And yes, the framework that governs these actions is programmed, but how and when they occur in my player’s field of view is not, or at least it feels that way.

And then there’s the moments that really can’t have been programmed. They can’t program the sun to rise just as a storm passes at the exact moment I’m reaching the top of a mountain just in time to witness the most beautiful flare of sunlight through a heavy cloud, silhouetting a lone tourist already at the peak, snapping their own photo. That’s the laws of the game as programmed by Rockstar serendipitously producing a unique moment – it hasn’t happened every other time I climbed a mountain.

It’s photography in every way that matters to me

So my verdict is this: sure, it’s not ‘real’ photography. Sure, I’m not taking any ‘real’ risks to get the photo, nor am I capturing any ‘real’ emotions in the in-game inhabitants I snap as they go about their day.

But serendipity is in full effect. I still have to find the shots, frame them up the way my eye likes them, pick the moment to press the shutter button. The ambient light is so well done that picking the right time of day to get the photo you want is just as important.

GTA V photos
An expensive shopping trip for sure
photography GTA V
A bloody protest outside Ponsonby’s. Just out of frame: the corpse

I have to make that photo somehow or other, even if it’s as grotesque and/or ridiculously unrealistic as blasting a pedestrian from just the right angle with just the right weapon so as to get their blood to spatter across the Ponsonby’s window in just the right way to send the message I want to send about that chain of stores and the patronising and supercilious staff they employ within.

In short

Photography within the world Rockstar created for GTA V is perfectly creative, limited only by your imagination, and all in all, it’s just meant to be fun.

But apparently that’s a very foreign concept to many in the photography world, and particularly amongst those that comment on Petapixel. Photography is ONLY done with REAL cameras. Photography is ONLY done with REAL film. Photography MUST meet their dictionary-rigid definitions and TO HELL with anyone who DARES to contradict them.

Well I’m proud to not be that boring, or limited by such narrow and humourless opinions about what ‘photography’ really is. I’m a hard-working professional real-life photographer, and I love messing about with the photography in GTA V. Bring it on.

Categories
Photographic

my glass eye won a joint 3rd on Photoblogchallenges.com!

tristan versluis creep
A still from C.R.E.E.P. (2013) directed by Tristan Versluis, photographed by me

Just a quick post to blow my own trumpet about placing joint 3rd in one of the weekly competitions over at Photoblog Challenges, which is nice! I started posting entries from my photoblog a few weeks ago when I ‘rebooted’ it after transferring over to WordPress from Pixelpost and it’s nice to feel part of a wee community again. If you’ve got a photoblog you should head over and check it out, take part in a couple of challenges and vote on a couple of others. Fun!

The photo itself is a still from Tristan Versluis’s scifi short C.R.E.E.P. which you can watch below:

C.R.E.E.P from Ascension Productions on Vimeo.

Categories
iOS & Mac how-tos

Tips & Tricks to ‘fix’ iOS 7

[toc]

I’ll make no secret of that fact that I love iOS 7. I just think the new layer-based interface works better and although I really enjoyed the ‘lickable’ look of iOS 6 – Corinthian leather and torn note pages aside – it was time to grow up and the glassy, minimal look really appeals to me. There’s definitely room for improvement, and I think the font choice and the wafer-thin lines in the UI icons in particular are style over usability, but it’s a cracking starting point.


Mind you, I’m someone who spends a lot of time fiddling around with tech so none of it really caught me by surprise and I’ve enjoyed playing with the new stuff, but for a lot of other users there’s a whole load of unwelcome and unexpected changes. The same complaints come up again and again so I’m putting together a list of the most common issues along with instructions to tweak the settings to ‘fix’ them. This is an ongoing project so if you have an issue not covered leave it in the comments and I’ll see if I can help.

You aren’t getting iOS 6 back – and I think that’s a good thing, long term – but you can set up iOS 7 a bit more how you like it.

Let’s get started.

How to stop iOS 7 wallpaper zooming

I covered this one in a separate post yesterday but here it is again. There’s two problems with wallpapers: parallax scrolling, and ‘zoom to fit’.

Parallax scrolling is a new feature for wallpapers in iOS 7 but to make it work the phone needs to zoom in a little on your photos so there’s a margin just off-screen all the way around that’s used to slide the wallpaper around when you tilt your phone. To disable Parallax Scrolling, turn on ‘Reduce Motion’:

  1. Open Settings from your Home screen
  2. Tap General
  3. Tap Accessibility
  4. Scroll down and tap ‘Reduce Motion: Off’
  5. Activate the ‘Reduce Motion’ feature by tapping the switch so it turns green.

The option on the Accessibility page should now read ‘Reduce Motion: On’ – and that’s it!

However, in iOS 7 there is also a ‘zoom to fit’ feature which cannot be disabled. This means if your image’s shape does not match the shape of your screen (e.g., a square Instagram photo), iOS 7 will zoom the image so there’s no black space around it.

To solve the problem use a screenshot of your desired wallpaper photo from the Photos app:

  1. Open the photo you want to use in the Photos app
  2. Tap the screen to make sure you’re seeing just the photo and none of the on-screen controls
  3. Take a screenshot by holding the Sleep and Home buttons at the same time – the screen will flash and the resulting screenshot will be saved to your Camera Roll.
  4. Select the new screenshot as a wallpaper.

This should completely solve wallpaper zoom issues!

How to make iOS 7 text easier to read

The system text in iOS 7 uses a lot of very light Helvetica and it can often be hard to read or make out. If that’s the case for you, we can give it more contrast by turning on an option in Settings that makes text look very much like it did in iOS 6:

  1. Open Settings from your Home screen
  2. Tap General
  3. Tap Accessibility
  4. Scroll down and tap ‘Increase Contrast’
  5. Tap the switch to turn it green, then return to the Accessibility menu
  6. Just above is ‘Bold text’. Tap the switch to turn it green too, and your phone will restart to apply the effect

After it restarts you should notice text is now much clearer and easier to read. Bear in mind that ‘Increase Contrast’ has the effect of darkening some backgrounds, which you may not appreciate. If so, turn of Increase Contrast.

How to ‘Swipe to delete’ in iOS 7

You used to swipe left-to-right to bring up the Delete button. In iOS 7 swipes from left-to-right trigger a new system-wide ‘back’ gesture, so to delete things you now need to swipe right-to-left.

It’s a little confusing at first, but you get used to it 🙂

How to delete individual text messages in iOS 7

So, swiping right-to-left doesn’t delete messages from the Messages screen – see the next item. This is a pretty stupid decision in my opinion, but you can still delete individual messages:

  1. Open the Messages app
  2. Open the conversation you wish to delete individual messages from
  3. Long-tap (touch and hold) on a message you want to delete from that conversation until the ‘Copy | More…’ option appears and tap on ‘More…’
  4. Now select the messages you want to delete – a blue tick appears in the circle to the left of each one. The first message you selected is already ‘checked’.
  5. When you’re ready, tap the Trashcan icon in the bottom left to delete the selected messages

How to show text message and iMessage time stamps in iOS 7

iOS 7 adds precise time stamps to all your iMessages instead of the vague and sporadic timestamps in iOS 6. To see them swipe from right to left and hold, anywhere on the screen in the Messages app.

I actually think this is a pretty dumb move – right-to-left swiping is used throughout the system to delete things, whereas in Messages it shows the timestamp and deleting is hidden away behind a menu option. I think it should be the other way around, personally.

How to show full names in iOS 7 Contacts

This is a weird decision: Apple added a new ‘first names only’ feature to Contacts, but activated it by default, which is incredibly unhelpful if loads of your friends have the same first name. Personally I know waaay too many people called ‘Nick’ for this feature to stay active. Here’s how you turn it off:

  1. Open the Settings app
  2. Tap on ‘Mail, Contacts & Calendars’
  3. Scroll down to ‘Contacts’ and tap on ‘Short Name’
  4. Either turn it off by tapping the green switch, or set it up how you’d like it (Name and initial, first name only, or last name only)

How to play music from the iOS 7 lockscreen

Double-tapping the home button in iOS 7’s lockscreen doesn’t bring up the music controls any more. Don’t worry! They’ve just moved into the fantastic Control Center feature that gathers controls for the music, brightness, volume, calculator, flashlight, timer, camera, Airplane mode, WiFi, Bluetooth, Do Not Disturb and orientation lock all in one panel.

This should already be enabled by default – if it is you’ll see a short bar at the bottom of the screen under ‘slide to unlock’. Just grab that bar with your thumb and slide up – Control Center should be revealed.

If you’re not seeing that bar then perhaps Control Center is disabled – have a look in the next section for how to turn it on.

Disable iOS 7 Control Center when you’re in an app

The gesture for activating Control Center can interfere with the gestures in some apps. If you’re finding it gets in the way in an app you use, you can disable Control Center in apps so it only works on the home and lock screens:

  1. Open Settings from your Home screen
  2. Tap Control Center
  3. Next to ‘Access within apps’ tap the green switch to turn it white (off)

If for some reason you also want to disable Control Center from the lock screen you can do that here too, and this is also where you go to turn it all back on. Obviously. 😉

How to improve iOS 7 battery life

Along with existing background features that suck battery there are a whole bunch of new ones to look into. I don’t turn all of the following off, and some are much less hungry than others, but these are all known to have some impact on battery life:

  • Parallax scrolling – turn on the ‘Reduce Motion’ feature as described above to disable the wallpaper parallax effect
  • Dynamic wallpapers – Apple included wallpapers with floating bubbles that react to tilt. They're cool, but they need power so try using a static picture.
  • Background updating – apps are now allowed to constantly poll for updates in the background which allows for faster app switching and the 'live' app screens in the app-switching view. Turn it off from Settings -> General -> Background App Refresh, either globally or app-by-app.
  • Automatic app updates – apps can now install updates automatically in the background, and there's that word again. I keep this off because I like to see what's new, but it also reduces the toll on the battery. Turn it off from Settings -> iTunes & App Store -> Automatic Downloads -> Updates.
  • Location Services – this is one you might want to keep on if you want certain apps to keep working like they should (e.g. weather, maps) but you can either globally or selectively turn it off from Settings -> Privacy -> Location Services.
  • App closing – contrary to popular belief, every app that's visible in the app-switching view is NOT open and running and sucking battery. Most are put into a frozen state when you switch, with only the most recent apps continuing to 'run', and even then only certain types of process allowed by Apple. You might claw back a few percent per hour constantly closing every single app in the list, but I have never bothered with this.

How to get weather & stocks and disable the calendar in iOS 7 Notification Center

Notification Center is still activated with a swipe down from the top of the screen but it’s now split over three tabs – Today, All and Missed.

Unless you tend to have a lot of different events every day you may not really need Notification Center’s full day view. There are also options to turn the weather and stocks views on and off:

  1. Open Settings from your Home screen
  2. Tap Notification Center
  3. Set up the options how you’d like them
  • ‘Calendar Day View’ toggles the calendar view in the Today tab. I don’t need my whole day broken down like that, but that’s just me
  • For weather enable the 'Today Summary' – there's currently no way to display weather graphically like in iOS 6.
  • Under ‘Access On Lock Screen’ I disable 'Today View' because it doesn't really contain any information I need from the lock screen; usually I'm looking for missed notifications

Change the colour of iOS 7 app folders

In iOS 7 a lot of the UI takes its colour from the wallpaper you’ve chosen. For example, the buttons of the passcode screen are based on your lockscreen wallpaper. And your app folder background is based on your homescreen wallpaper, as is the new dock.

So to change the colour of your app folders, change your wallpaper!

Can you ‘tap to tweet’ from the Notification Center?

Nope, Apple have killed this one completely. Why? At first I suspected it had something to do with Twitter’s ever-more-ridiculous demands on Twitter app makers. Then I figured that maybe tweeting isn’t something that fits into the Notification Center’s remit; it’s not a notification

Either way, your best bet is to install a Twitter app and keep it in your dock. Sorry the news isn’t any better!

Can you roll back to iOS 6?

Nope, iOS updates are kind of a one-way trip and you can’t get iOS 6 back any more I’m afraid. Long live iOS 7!

You might have heard there are tricksy technical ways to do it, but there really aren’t. You can’t reinstall a backup to restore iOS 6 because backups don’t back up the OS files, only the data on your phone. And Apple’s servers have stopped authorising the last known versions of iOS 6 anyway so even if you had a copy of just the OS, iTunes wouldn’t let you install it.

Just embrace iOS 7! There’s a lot more awesome stuff happening under the hood that can’t be ‘seen’ but will really set iOS up for the future. Have a really good poke around the Settings and set it up the way you like it, you’ll get used to the rest of it before you know it.

Hope this helped, thanks for reading!

Categories
iOS & Mac how-tos

How to stop custom wallpapers ‘zooming in’ in iOS 7

UPDATE: If you’re having problems adjusting to iOS 7 check out my updated post – ‘How to ‘fix’ iOS 7′, which includes the following wallpaper zooming tip and many others including clearer text, swipe-to-delete and battery issues.

ORIGINAL POST: So iOS 7 is out, and boy oh boy is it ruining some people’s lives. Bit melodramatic perhaps, but you should see the whining about it on Twitter…

Personally I really like it – sure, there’s a couple of icons that don’t make sense (Game Center) or look clunky (Newsstand) and occasionally small system text lacks legibility (which is fixable with a setting tweak) but overall I think the clean layer-based system is just lovely and a great basis for the future.

However, it’s also fair to say a lot of things have changed just enough to leave casual users a little lost or confused and one of the biggest gripes seems to be that custom photos are being zoomed in when selected as wallpapers.

I thought I’d do my Community Help bit for the day and post some solutions to wallpaper-zooming right here. There are two issues to deal with: parallax scrolling, and none-native aspect ratio images (not the same shape as your screen). It’s very easy to fix: read on!

Solution One – parallax scrolling

The first solution deals with the slight zoom caused by the parallax effect. This is when you tilt your phone and the wallpaper and icons shift to give the impression they’re on different layers. The wallpaper needs to be zoomed a bit to create a margin offscreen so that when it moves you don’t see off the edge.

Here’s how to disable it:

  1. Open Settings from your Home screen
  2. Tap General
  3. Tap Accessibility
  4. Scroll down and tap ‘Reduce Motion: Off’
  5. Activate the ‘Reduce Motion’ feature by tapping the switch so it turns green.

Parallax scrolling is now disabled and wallpapers should not be zoomed for it. However, you may still have wallpaper zoom issues, in which case:

Solution Two – zoom to fit

If the shape of your photo does not match the shape of your screen then it will be zoomed to fit so that there is no black space around the sides. For example, if you’re using a square Instagram shot or a 4×3 photo on the long screen of the 5, 5S or 5C you’ll be seeing a lot of zoom.

There’s an easy workaround: just use a screenshot!

  1. Open the photo you want to use in the Photos app
  2. Tap the screen to make sure you’re seeing just the photo and none of the on-screen controls
  3. Take a screenshot by holding the Sleep and Home buttons at the same time – the screen will flash and the resulting screenshot will be saved to your Camera Roll.
  4. Select the new screenshot as a wallpaper.

Hope this helps! Remember folks: it’s just a phone… 😉

Categories
Apple

You Need A Budget for iPhone updated for iOS 7

you need a budget iPhoneThe excellent You Need A Budget for iPhone (free) (or YNAB to its friends!) just got a hefty redesign for iOS 7, and it’s rather lovely.

The new look is a bit of a departure from the look of the main desktop app (for Mac and PC) but it fits in a lot better with the simpler, almost minimalist look of iOS 7 and actually makes several elements much clearer and easier to manage, especially when entering ‘splits’ or when picking a Payee based on your location. A particularly nice new touch is a pop-up update of the ‘before’ and ‘after’ totals of a budget category when you add a transaction, making it even easier to keep up-to-date with the month’s spending.

As the App Store description page points out, YNAB for iPhone is a companion app for entering transactions on the go and keeping an eye on your running budget totals but it requires the full Mac/PC app to be of any use. It doesn’t have any budget-managing options – though I hear they’re working on a standalone iPad app that will meet that need – but your budget is available to view, however. It syncs over from the desktop via Dropbox and you tap your on-the-go transactions into the app as they occur. Of course, you don’t necessarily need the iPhone app, you could just import a downloaded statement to the desktop app periodically, but I find that makes it harder to keep on top of your budgeting day-to-day.

you need a budget iPhone
The redesign of You Need A Budget for iPhone is clearer and easier to use

So overall a great-looking update with some welcome new features. However, a couple of old features seem to have been lost including the ‘Favourites’ tab for quickly selecting regularly-used Categories and Payees.

According to the developer the autocomplete for Category and location-based Payee ultimately do the same job and for the most part I expect that’s probably the case but for me the Favourites filter was quicker and easier than relying on Autocomplete, narrowing dozens of budget categories down to the four or five I only ever needed on my phone whenever I had to manually enter a category or change the one Autocomplete entered.

They’ve also made a Search function more accessible but I found that tapping to activate it, then typing, then tapping the results was all more faff than using the old Favourites tabBut hey, not the end of the world! 😉

So in summary – a largely welcome update, with a couple of niggles I’ll just have to get used to.

Save 10% on You Need A Budget

You Need A Budget is a fantastic Mac/PC personal budgeting app and I highly recommend you check it out if you’re looking for an intuitive, effective way to manage your household income or even a small business.

If for some reason you’re reading this but you don’t actually have your own copy of YNAB yet, click here to find out how to save 10% on your purchase over at youneedabudget.com!