(UPDATE: if you’re reading this you might be interested in a Photoshop action I wrote to sort of emulate the look of these retro camera styles – have a read of ‘my Hipstamatic effect for Photoshop’ after you’re done here. Okay, as you were!)
I recently went off iPhone photography for a while. I’d set myself the goal of uploading a new iPhone photo every single day to my Tumblr blog and within a few months it became a kind of millstone around my neck and so I went off iPhone photography for a bit, had a clean-up of apps I never use and cleared out the thousands of photos in the filmroll which was slowing the camera dooown.
A few weeks later I’m sort of getting the itch again. Just a tingling really, nothing to see the doctor about. Well, I had a little look in the photography section of the App Store the other day, not to buy anything you understand, just to see if there was anything new and exciting to play with and clicked on Hipstamatic (App Store link) almost by chance really. There’s quite a lot of Lomo and Holga style apps already, and I felt like I had got one of the best in ToyCamera. Hipstamatic’s icon isn’t flashy, but the name is catchy and it had a great rating, so I gave it a go and I love it.


It’s so fun to play with and use. The way it works is that you have the basic Hipstamatic ‘body’ and you select a combination of one lens and one film, then optionally charge up one of four ‘flashes’. The display has two ‘sides’, the front and back of the imaginary Hipstamatic camera, styled after the Instamatic range of cameras. Along the bottom of the front display are buttons allowing you to change the film, flash or lens, buy new packs from the shop or flip to the back screen. Alternatively you can swipe the lens to swap in the next available lens. On the back is a small squarish live viewfinder, the flash charger and the huge yellow shutter release button, and if you shake the phone you get a completely random setup.


So you select your film, lens and optional flash, take the shot, then wait a few seconds while it ‘prints’ the shot and saves it into the iPhone camera roll as well as the app’s own gallery. Tapping the gallery button takes you into a gorgeous gallery display where you slide through your recent prints. Tapping one flips it over to reveal the lens, film and flash settings. From here you can copy the settings for your next shot, share it through Facebook, Twitter or email, bin it or enter it into one of the regular contests the developers run.


A full kit comprises 8 films, 6 lenses and 4 flashes but the app comes with only 3 lenses (John S, Jimmy, and Kaimal Mark II), two flashes (Standard and Dreampop), and two films (Ina’s 1969, and Kodot Verichrome) as standard and further expansions cost 59p per ‘Hipstapack’. Each pack usually contains at least one lens and film, and occasionally an extra flash and purchasing them takes you into a custom-built store with it’s own gorgeous graphics. I really love all this attention to detail.
So it’s a pretty slick app!
The fact that you can combine any film with any lens means that theoretically you’ve got 48 different looks available, plus even more variations on those by using one of the different flashes which basically just apply a splash or wash of colour or ‘light’ depending on what you use. In practice, however, a few of the different looks are all but identical apart from the frame applied. On the other hand, something I really liked is that while other apps often have a set vignette effect that doesn’t change much if at all from shot to shot, Hipstamatic appears to have quite a variety available meaning it’s rare to get exactly the same vignette effect on two consecutive shots using the same settings. That’s a nice touch and really adds to the realism of the effect.
In the name of testing these effects, I spent 20 minutes crouched in Hyde Park trying each and every combination on the same scene. You better appreciate this:

If you’d like to see it in much greater detail, the original is available to download from Flickr here – a 12MB download but each image is original resolution.
As you can see, the first three films are identical except for frame, and I hope you can see what I mean about the slightly naff Kodot frame! B&Ws are also pretty similar, and although the blurb for the first BlacKeys film says it prints the date on, the only date I’ve ever seen is MAR 80 so I’m not too sure what’s happening there. Nice frames though, and my favourite film of all of them is the last one, Float. I love the smudgy contrasty vignette and artifacts it produces.
In terms of the lenses themselves there’s a good selection of looks no matter your taste, although John S is the one I find myself going back to most often. Don’t forget to experiment with all the films though. For example, the severe yellow look of Jimmy doesn’t do much for me until it’s paired with the Float film and you get a nice slightly faded off-green look. On the other hand, Kaimal turns everything a bit too red, and again the Float film saves the day, pulling it all back a bit.
It’s almost churlish to moan about something with such variety and charm, but… as I touched on above the two films that come with the basic pack and a third from the premium packs are exactly the same in terms of colour processing with the only difference being the frame they apply. The premium of these, Kodot, has a really fake looking scrappy frame which I think is the poorest of all 8 films. While I’m being picky, the two B&W films also seem pretty similar except for the frame despite implying in the name that one offers more contrast.
I only noticed when having a look close-up that several of the lenses (Jimmy, Helga and Lucifer) aim to recreate the imperfect toy-camera look by ghosting the image and you end up with what looks like camera shake on a long exposure. I’m not a fan of that as I’d rather they just slightly softened the image around the edges rather than make me look like I’ve got the shakes. It’s a shame as Helga and Lucifer in particular produce some lovely colouring.
I’m critiquing on a very personal level but hey, I’ve used a lot of Lomo-like camera apps and spent many an hour tinkering in Photoshop creating similar looks for own DSLR images so I knows what I likes. So I’ve got a couple of reservations, but I love this app as much for it’s fun interface and the huge variety of looks it produces as for getting me back into iPhone photography. This is well worth your cash, folks, and to give you a flavour of how it performs on scenes other than Hyde Park, here’s a few more shots I took the same day.


Cheers for reading!


 The wealth of photography apps on the Store offer a huge variety of options to the experience of taking a photo. There’s a lot of repetition though, and plenty of trash, so I’ve only ever gone for apps that were either considered the best or which appealed in some other way, such as the interface. Whatever you can think of, by this point there is almost certainly “an app for that” (grr). I’ve just had a clear-out and the core bunch that will never leave are CameraBag, QuadCamera, ToyCamera and Tiltshift Generator. I’ll look at those four today, and they’re really fantastic if you’ve not heard of them.


 Also, I’ve disabled the ‘crop’ feature in the settings, but when it’s active it crops the Helga, Lomo and Instant filters square, crops 1974 almost square, and Cinema into a narrow 16:9 format which really doesn’t work well on vertical images. There’s also a border option and you can vary the output size of the saved images if your iPhone is struggling – like most camera apps it gobbles up memory and so like most camera apps has garnered its fair share of negative reviews on the App Store for regularly crashing if it’s been a while since you last rebooted the phone. If that happens restarting is generally necessary but the I’d have thought the iPhone 3GS would run it well – can anyone confirm that?


 In terms of customisation there’s a slider to alter the delay between each shot in your sequence, whether to shoot 4 or 8 shots and whether to lay them out in a row or in a 2×2 or 2×4 arrangement. There’s a selection of filters: Vivid, Bright, Dull, Hi Con, Grayscale and No Effect. If you choose the 1×4 or 1×8 options the app will lay them out vertically for landscape oriented shots, or horizontally for portrait orientation.


 Up until recently the app used to apply the filters randomly by default, which was frustrating if the filter it chose didn’t suit the image (they really can be too much sometimes). Now, however, you can choose a specific filter to be used but only before you shoot; you can’t pick an effect to apply to a photo you already have, like you can with CameraBag for example. If you’re into the whole random ‘shoot from the hip’ ethos that the Lomographic people promote then you can activate the random mode and select which effects you’d like it to choose from.


 If you’re a photographer and you use a Mac, chances are you’ve probably already heard of the vast majority of these, but it’s still a pretty good list so I really ought to link to it before I lose too many readers.
 I’ve got a new obsession on my iPhone, and it’s name is
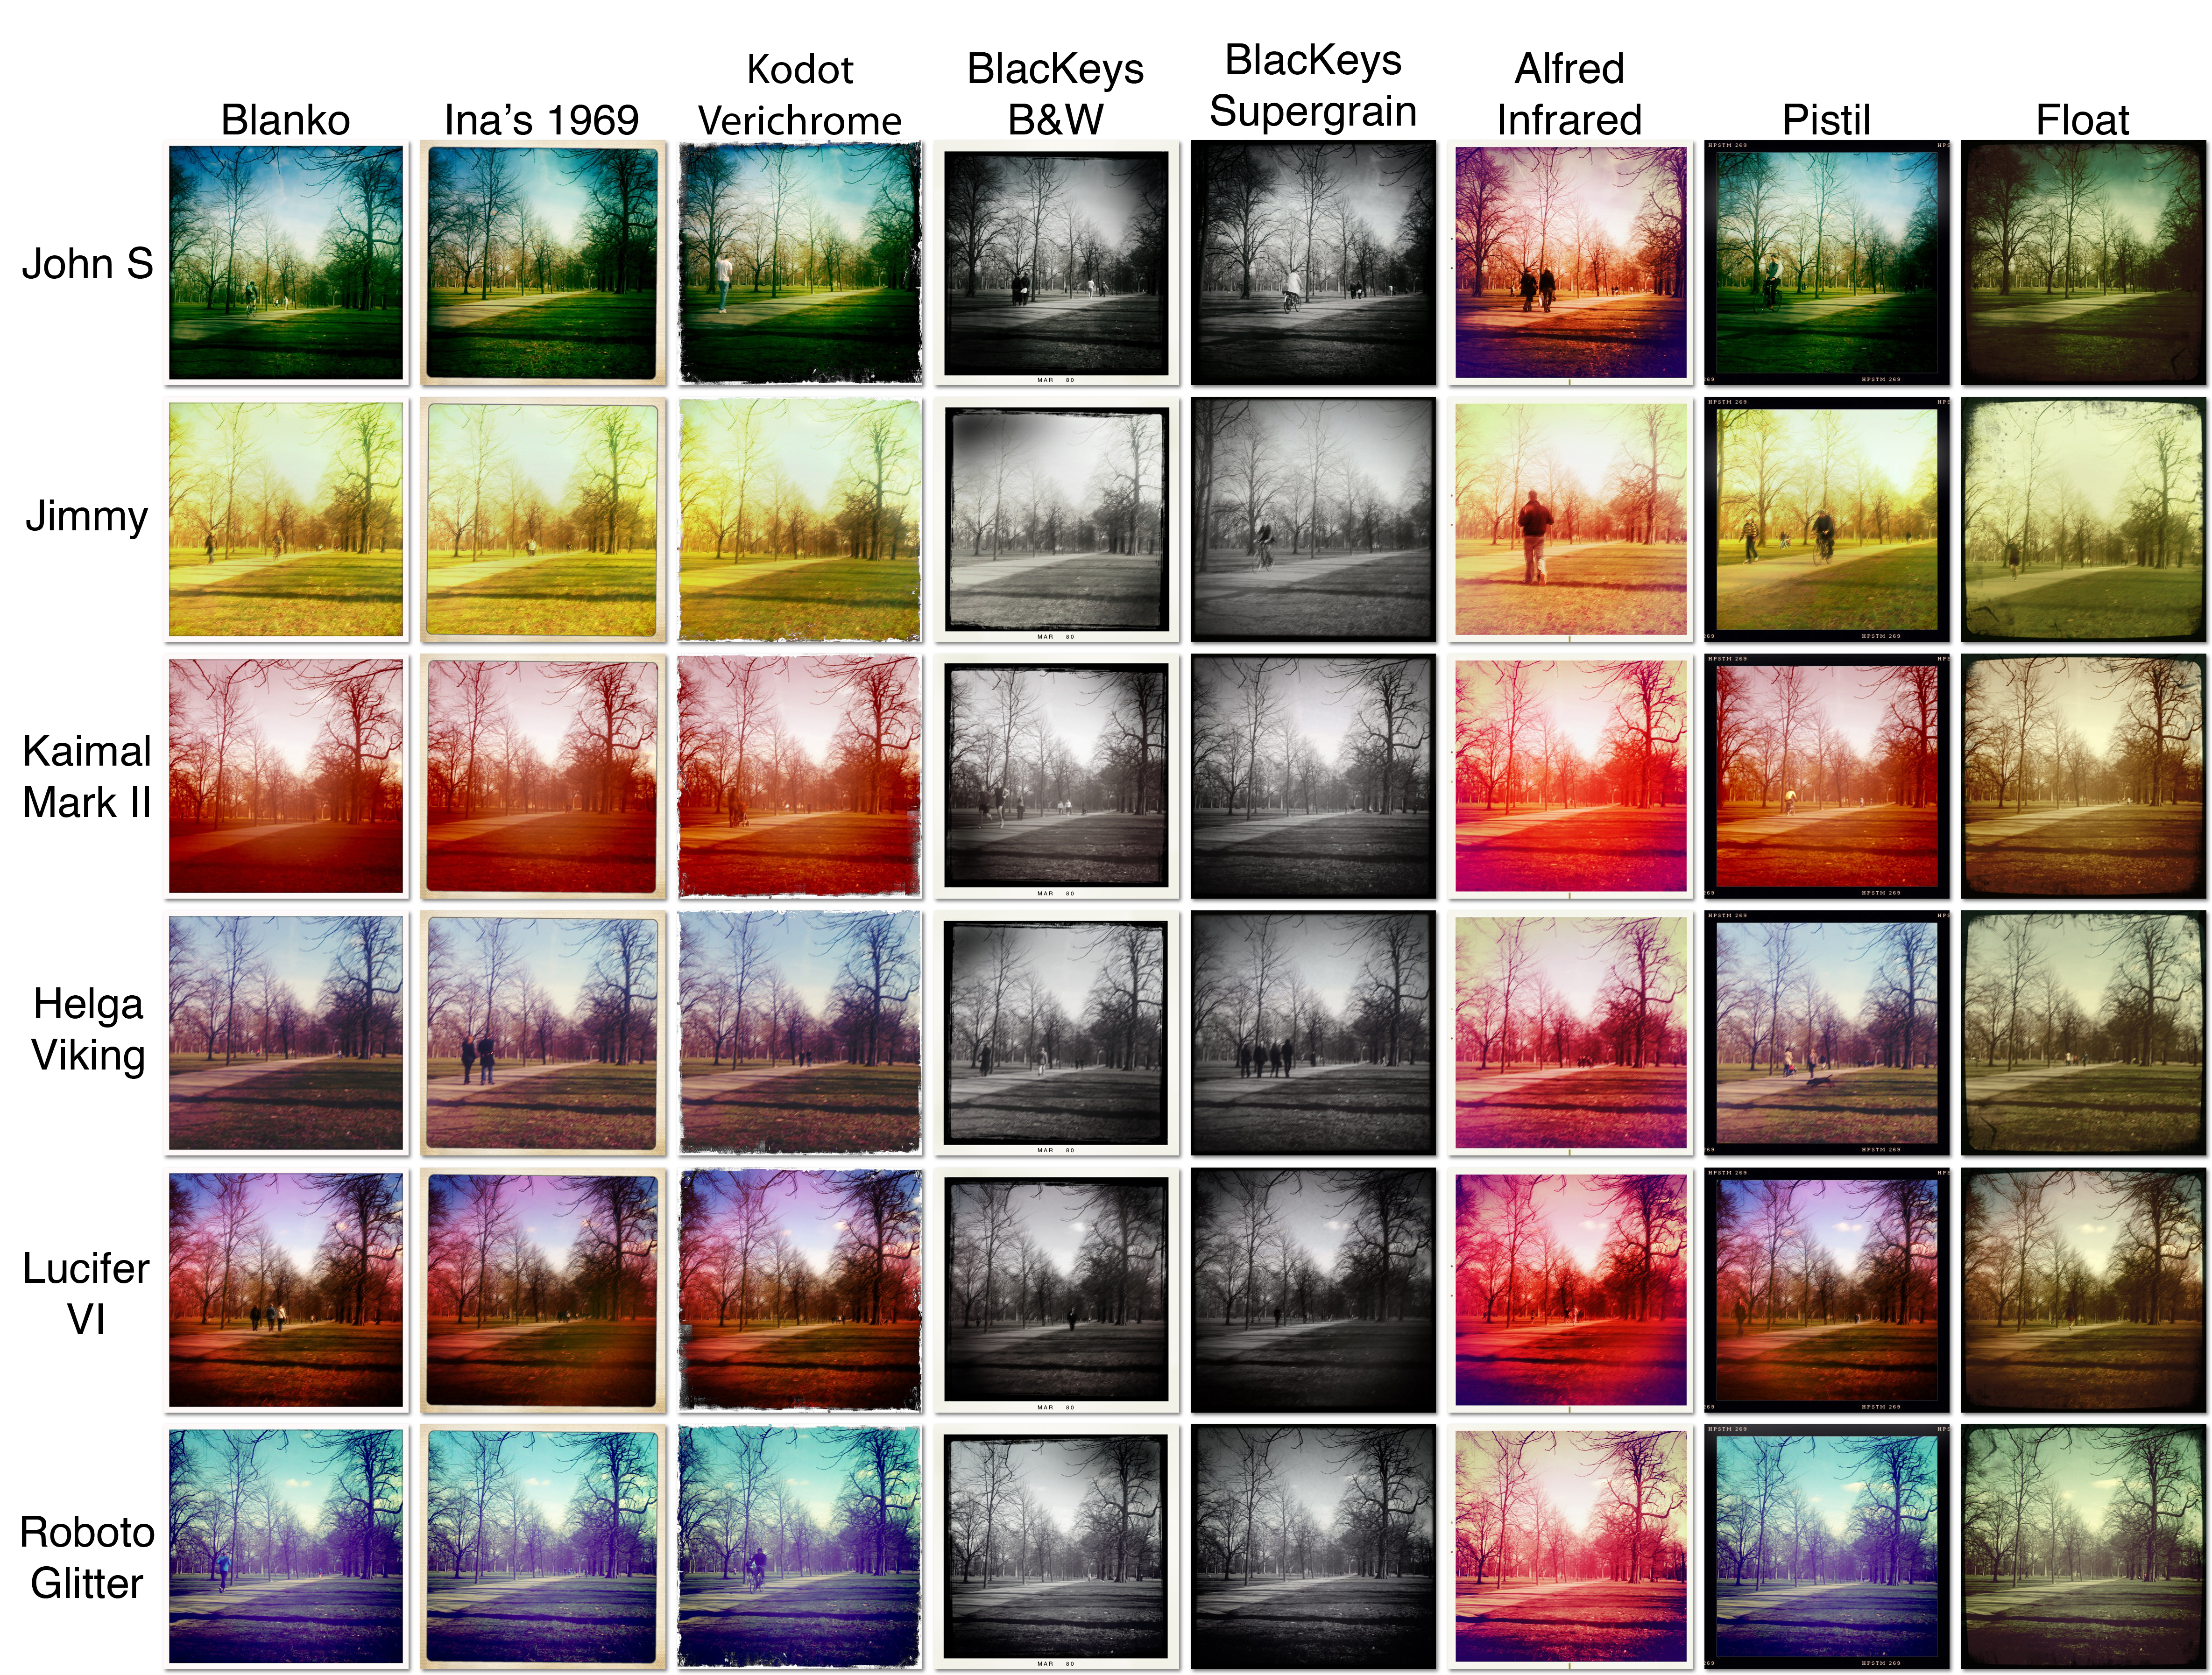